You mopped up the standing water. The plumber fixed the pipe. The immediate crisis is over. But your walls are still damp, the carpet squishes when you walk on it, and you can feel the humidity hanging in every room. Now what?
Drying out a water damaged home is the part most homeowners underestimate. The visible water is maybe 30% of the problem. The rest is moisture trapped inside drywall, soaked into carpet padding, wicking up behind baseboards, and sitting in your subfloor where you can't see it. That hidden moisture is what leads to warped floors, peeling paint, and mold colonies growing in your wall cavities within 48 to 72 hours.
This guide covers everything you can do yourself to start drying your home before a professional crew arrives or while you figure out whether you need one. We cover room-by-room approaches, the right household equipment to use, what actually works versus what wastes your time, and the clear signals that tell you DIY drying isn't enough. If you already know you need professional help, call (844) 426-5801 and our IICRC-certified team will be at your door within 60 minutes with industrial drying equipment.
One important note before we start. This guide is about what homeowners can handle with household tools for smaller water events, things like a washing machine overflow, a toilet that ran for a few hours, or a small leak under a sink. If you're dealing with large-scale flooding, sewage backup, or water that has been sitting for more than 24 hours, skip the DIY approach and go straight to professional water damage restoration. The health risks and structural stakes are too high.
First Steps: What to Do in the First 60 Minutes After Water Damage
The clock starts the moment water hits your floor. What you do in the first hour determines whether you're dealing with a three-day drying project or a three-week restoration nightmare. Here's the priority order.
- Minute 0-5: Stop the water source (shut off valve or main)
- Minute 5-10: Turn off electricity to affected areas at the breaker box
- Minute 10-20: Document everything with photos and video for insurance
- Minute 20-60: Remove standing water with a shop vac, mop, or towels
- Any time: Call (844) 426-5801 if you need professional help
Stop the water source
This sounds obvious, but you would be surprised. We've walked into homes where the homeowner spent an hour mopping while the supply line was still actively leaking. Find the source and stop it before you do anything else.
If it's a burst pipe or a supply line, shut off the water at the nearest valve or your main shutoff. If it's a roof leak and it's still raining, contain the water with buckets and tarps.
Turn off electricity to affected areas
Water and electricity are a lethal combination. Go to your breaker box and turn off circuits for any room with standing water or significant moisture on walls and floors. If you can't reach your breaker box without walking through standing water, call an electrician or your power company. Don't take risks here.
Document everything for insurance
Before you start cleaning up, pull out your phone and take photos and video of everything. Every wet surface, every damaged item, every room affected. Your insurance claim depends on documentation, and the evidence disappears fast once you start drying. Open cabinets and closets, photograph behind furniture, and record video showing the extent of the water.
A homeowner in a suburb of Dallas taught me this lesson the hard way. She had a dishwasher supply line fail while she was at work. Came home to water across the entire kitchen and into the dining room. Her first instinct was to start cleaning, and she mopped and toweled for two hours before calling anyone.
By the time she filed her insurance claim, she had almost no photos of the original damage. The adjuster questioned the extent of the loss, and her claim payout was about $2,800 less than it should have been. Document first. Always.
Remove standing water
Get the bulk water out as fast as possible. Use a wet/dry shop vacuum if you have one. If you don't, use mops, towels, and buckets. Push water toward floor drains if you have them. The goal is to get standing water off the floor within the first hour if you can.
For carpet, a shop vac is almost essential. You need to pull water up from the carpet and the pad beneath it. Make slow, overlapping passes. You'll be amazed how much water a shop vac pulls out of carpet that feels only slightly damp on the surface. Empty the tank frequently; a five-gallon shop vac fills up faster than you expect.
Need Professional Drying Equipment?
Our IICRC-certified team arrives within 1 hour with industrial dehumidifiers and air movers.
📞 Call (844) 426-5801How to Dry Water Damaged Walls
Walls are where most homeowners make mistakes during the drying process. The surface may feel dry to the touch within a day, but the inside of the wall cavity can stay wet for weeks. Drywall is essentially a gypsum sandwich between two layers of paper, and it wicks moisture both up and inward. A wall that had water at the baseboard level can have moisture 18 to 24 inches up, hidden behind the paint.
Remove baseboards
This is the single most effective thing you can do for wall drying, and it's the step most homeowners skip. Baseboards trap moisture against the bottom of the wall. Pop them off carefully with a flat pry bar and a putty knife.
Number each piece with a pencil on the back so you can reinstall them in the same order later. This exposes the bottom edge of the drywall and allows air to circulate into the wall cavity from below.
Create airflow along the wall surface
Point box fans or any fans you have at the wet walls. Position them about a foot away from the wall and angle them so the air flows along the surface rather than directly at a single spot. You want to create a moving air current that sweeps across the wet area, carrying humid air away from the surface so drier air can take its place.
If you have multiple rooms affected, prioritize the room with the most wall damage. One well-placed fan running 24 hours a day is more effective than six fans running sporadically.
When drywall needs to come out
Here's the honest assessment. If the water sat against your walls for more than a few hours, or if the drywall feels soft and crumbly when you push on it, household fans aren't going to save it. Saturated drywall loses its structural integrity and becomes a mold incubator.
In professional restoration, we make what's called a "flood cut," removing the drywall to about two feet above the visible water line. That exposes the studs and insulation so they can dry properly.
You can do this yourself if you're comfortable with a utility knife and a drywall saw. Score the drywall with a utility knife at 24 inches above the water line, then cut it out. Pull out any wet insulation.
This lets you point fans directly at the exposed studs and framing. The wall cavity dries ten times faster when it's open than when it's sealed behind intact drywall.
If you're not sure whether your walls need professional attention or if the damage is more extensive than a small area, our team can assess it in person. Call (844) 426-5801 for a damage assessment and we'll tell you exactly what your walls need. For the detailed science of how professionals dry wall cavities, studs, and structural framing, see our guide to structural drying services.
Drying Out Water Damaged Floors
Floors take the hardest hit in almost every water event because gravity sends water down. The approach depends entirely on what type of flooring you have, and some floor types are far more forgiving than others.
Carpet and carpet padding
The carpet itself isn't the problem. The pad underneath is. Carpet padding is like a sponge, it absorbs water and holds it against your subfloor. If the padding stays wet, your subfloor stays wet, and that's where mold starts.
For a small area, pull back the carpet from the tack strip along one wall, remove the wet padding, and set it outside or in the trash. Run fans over the exposed subfloor and underneath the carpet you pulled back.
If the subfloor is plywood, it can take 24 to 48 hours of active fan drying to get it back to a safe moisture level. Concrete subfloors hold moisture longer. You may be able to put new padding down and re-stretch the carpet once everything is dry.
For large areas, honestly, this is where DIY hits its limit. Pulling up carpet across an entire room, removing all the padding, and drying a full subfloor takes industrial equipment. Our emergency water extraction crews handle this daily.
Hardwood floors
Hardwood floors need special care -- avoid direct heat and aggressive fan drying, which causes the surface to dry faster than the core and leads to permanent warping. Gentle, consistent airflow with a dehumidifier is the right approach for homeowner-level drying. See our hardwood floor water damage guide for the full explanation of cupping, crowning, and buckling, plus when refinishing can save the floor versus when replacement is the only option.
Tile and vinyl
Tile floors often survive water damage well because the tile itself doesn't absorb water. The concern is what's underneath. Water gets through grout lines, especially cracked or aging grout, and soaks into the backer board or plywood substrate below.
If your tile floor was submerged, mop up the surface water and then run a dehumidifier in the room for several days. The subfloor underneath needs time to dry through the grout lines.
Vinyl plank and luxury vinyl tile (LVT) handle water better than most flooring. But sheet vinyl can trap water underneath if it's glued down, creating a pocket of moisture that you can't see and air can't reach. If you notice the vinyl bubbling or lifting at the edges, water is trapped underneath and needs to be addressed.
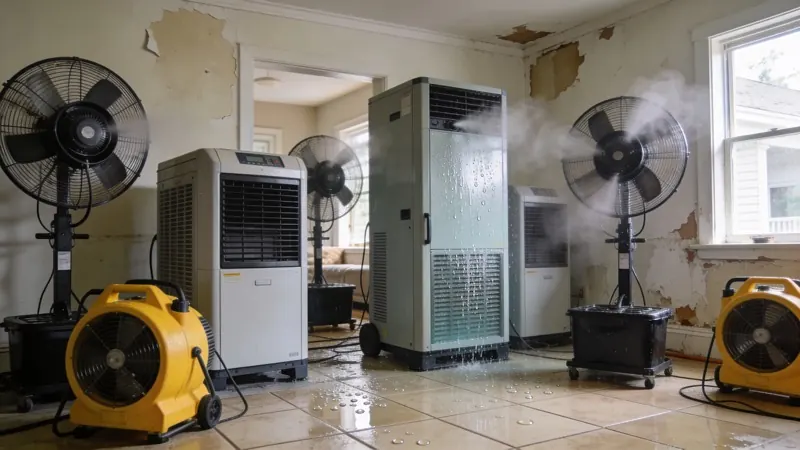
Equipment That Actually Works for Drying a Flooded House
Not all drying equipment is created equal, and some approaches that seem logical actually make the problem worse. Here's what actually works with household tools and what doesn't.
Dehumidifiers: your most important tool
If you only buy or borrow one thing, make it a dehumidifier. Moving air with fans helps evaporation, but if you don't remove moisture from the air, you're just recirculating humid air. The relative humidity in a water-damaged room can easily hit 85% or 90%.
At that level, evaporation basically stops because the air is already saturated. A dehumidifier pulls water out of the air, dropping the humidity so that wet materials can release their moisture.
A 50-pint residential dehumidifier running 24 hours a day removes about six gallons of water from the air. That's decent for a single room with moderate damage. For comparison, a commercial LGR (Low Grain Refrigerant) dehumidifier that restoration crews use pulls 15 to 20 gallons per day and works efficiently at lower humidity levels where consumer units struggle. The performance gap between consumer and commercial equipment is significant, but a consumer dehumidifier is still far better than no dehumidifier.
Place the dehumidifier in the center of the affected area if possible. Empty the collection bucket regularly, or run a hose from the drain port to a sink or floor drain so it can run continuously. Close windows and doors to the room so the dehumidifier is working on a contained space rather than trying to dehumidify the outside air.
Fans: use them right
Fans create airflow, which speeds evaporation from wet surfaces. Point them at the wettest areas, along walls (not directly into the wall from four inches away), and across floors. Position multiple fans to create a circular airflow pattern in the room if you can. One fan blowing toward a wet wall and another pulling air away from it creates a convection cycle that's much more effective than a single fan.
Box fans, floor fans, oscillating fans, ceiling fans, whatever you have. Run them continuously. Don't turn them off at night to save on the electric bill. Drying is a 24-hour process, and every hour those fans are off, the moisture in your building materials isn't moving.
What does NOT work
Opening all the windows. This is the most common mistake we see. If the outdoor humidity is higher than your indoor humidity, you're adding moisture to the problem. In Houston in August, outdoor humidity sits at 80% to 95%. Opening windows would make drying impossible.
Even in dry climates, outdoor conditions vary throughout the day. Unless you know the outdoor humidity is significantly lower than what's in the house, keep windows closed and run the dehumidifier.
Space heaters and hair dryers. Heat without dehumidification just creates a sauna. Warm, moist air is the perfect environment for mold growth. And direct heat on wood or drywall dries the surface while trapping moisture deeper inside, causing cracking, warping, and material failure.
Rice, baking soda, and cat litter. These work for a wet cell phone. They don't work for a wet house. The volume of moisture in a water-damaged room is measured in gallons, and a bag of rice absorbs maybe a tablespoon. Save your rice for dinner.
Room-by-Room Drying Guide
Different rooms have different challenges based on the materials, fixtures, and access points in each one. Here's what to focus on in the most commonly affected areas.
Kitchen
Water damage in kitchens usually comes from under the sink, dishwasher supply lines, or refrigerator ice maker lines. The biggest concern is water getting under cabinets and behind them where you can't see it. Pull out the kick plates at the bottom of your cabinets.
This is the removable panel below the cabinet doors. Remove everything from under the sink and inside lower cabinets. Point a fan under the cabinet to circulate air through the toe kick space.
If water reached behind the cabinets against the wall, that drywall is wet and you can't access it without removing cabinets. A small leak caught quickly may dry on its own if you promote airflow. A significant leak that soaked the wall behind the cabinets for hours is a situation where professional equipment makes a real difference. Technicians can use injectidry systems that pump dry air into wall cavities without tearing out cabinetry.
Bathroom
Bathrooms are designed to handle some water, but they aren't designed to handle a toilet overflow or a supply line failure that floods for hours. The most common problem is water getting under the toilet base, behind the vanity, and into the subfloor around the tub. Tile may look fine on the surface while the subfloor underneath is soaking.
Remove the toilet tank lid and check for running water. Pull out the vanity drawers and point a fan underneath. If the bathroom has a vent fan, run it 24/7. It was designed to remove moisture from this room.
Check the ceiling of the room directly below, especially if the bathroom is on a second floor. Water from a bathroom overflow travels straight down through the subfloor and shows up on the ceiling below as stains, drips, or sagging drywall. For more on ceiling damage specifically, see our page on ceiling water damage.
Basement
Basements are the toughest rooms to dry yourself because they are below grade, have concrete floors that hold moisture for weeks, and typically have less airflow than rooms above grade. A dehumidifier is absolutely essential for basement drying, not optional.
If your basement has finished walls (drywall over studs) and those walls got wet, moisture gets trapped between the drywall and the foundation wall. Pull the baseboards, and if possible, cut the drywall at least 24 inches above the water line to expose the cavity. Basements need aggressive drying -- if there's any doubt, get a moisture reading from a professional. For detailed guidance on basement-specific issues including foundation cracks, sump pump systems, and waterproofing, see our basement flooding page.
Living rooms and bedrooms
These rooms are usually the most straightforward to dry. Move furniture away from wet walls and off wet carpet. Remove area rugs and dry them separately outside if weather allows. Stand couch cushions on end so air circulates around them. Check inside closets, especially if the water source was near a shared wall.
Books, papers, and fabric items absorb water and hold it. Remove them from the room so they aren't adding moisture to the air the dehumidifier is trying to dry. Wet books can actually be frozen to prevent mold growth until you have time to deal with them. Stick them in a freezer bag and put them in your freezer.
Water Damage Covering Multiple Rooms?
Our team brings industrial dehumidifiers and air movers to dry your home in half the time.
📞 Call (844) 426-5801How Long Does It Take to Dry Out Water Damage?
This is the question every homeowner asks, and the honest answer is: it depends on how much water, what materials are wet, and what equipment you're using. Here are realistic timelines.
| Material | DIY Drying Time | Pro Drying Time | Key Notes |
|---|---|---|---|
| Carpet (surface) | 12 to 24 hours | 6 to 12 hours | Padding underneath takes 2-3x longer; pull it if you can |
| Carpet padding | 24 to 72 hours | 12 to 24 hours | Best to remove and replace -- traps water against subfloor |
| Drywall (minor) | 48 to 72 hours | 24 to 48 hours | Wall cavity moisture can persist 1-2 weeks; remove baseboards |
| Hardwood flooring | 3 to 7 days | 2 to 4 days | Don't call it dry until cupping resolves and boards sit flat |
| Concrete subfloor | 1 to 3 weeks | 5 to 10 days | Only a moisture meter confirms concrete is actually dry |
| Plywood subfloor | 2 to 5 days | 1 to 3 days | OSB may swell permanently and need replacement |
Professional restoration equipment typically cuts these timelines roughly in half. A commercial LGR dehumidifier and properly placed air movers create drying conditions that household equipment simply can't match. If time matters, and when it comes to mold prevention it always does, professional drying delivers faster results.
How to Know Your Home Is Actually Dry
"It feels dry" is the most dangerous phrase in water damage restoration. Materials that feel dry on the surface can hold dangerous levels of moisture inside. Here's how to tell whether your home is actually dry or just surface-dry.
Buy or rent a moisture meter
A pin-type moisture meter costs $25 to $50 at any hardware store. It pushes two small pins into the material and measures electrical resistance, which correlates to moisture content. This is the same principle professional meters use, though professional meters are more precise and offer more features.
| Material | Target Reading | Notes |
|---|---|---|
| Wood framing / subfloor | Below 16% | Lumber from the store typically reads 8-12% |
| Drywall | Below 1% (relative scale) | Or below 16% on wood-equivalent meters |
| Hardwood flooring | Within 2-4% of dry reference | Compare to an unaffected area of the same floor |
| Concrete | Below 75% relative humidity | Use a calcium chloride test or in-situ probe for accuracy |
Take readings in multiple spots. Don't just check one corner and call it good. Moisture migrates through materials, so the wettest spot may not be where the water originally entered. Check behind baseboards, near the floor line, and at the top of the wet zone.
Use the smell test (but don't rely on it alone)
A musty or earthy smell in a room that had water damage usually means moisture is still present somewhere. Your nose is surprisingly good at detecting mold and mildew. But the absence of smell doesn't mean the absence of moisture. Mold can grow inside wall cavities where you can't smell it until the colony is well established.
Check for secondary damage signs
Even after drying, watch for these warning signs over the following weeks:
- Paint bubbling or peeling on walls that were wet
- Baseboards that are warping or pulling away from the wall
- Carpet that develops a smell after being re-installed
- Drywall that feels soft or crumbly at the bottom edge
- Visible mold spots on walls, ceilings, or in closets
- A persistent humidity that the HVAC system seems unable to control
Any of these signs mean moisture wasn't fully removed during drying. If you notice them, don't wait. Call (844) 426-5801 for a professional moisture assessment before the problem gets worse. Finding hidden moisture early can save thousands in mold remediation costs.
When DIY Drying Is Not Enough: Call a Professional
This guide is designed for small, clean water events that you caught quickly. If the water was contaminated, multiple rooms are affected, water sat for more than 24 hours, or you smell mold, DIY drying isn't enough. Our water damage cleanup page has a detailed breakdown of exactly when DIY is appropriate versus when you need professional intervention. When in doubt, call (844) 426-5801 for an honest assessment.
Preventing Mold While Drying Out Your Home
Mold can begin growing within 24 to 48 hours of water exposure, so your entire drying effort is essentially a race against mold. See our mold remediation page for the detailed growth timeline and prevention steps. Here are the practical things you can do during drying to tip the odds in your favor.
Keep humidity below 60%
Mold needs moisture in the air to grow, not just moisture in materials. If your indoor relative humidity stays below 60%, mold growth slows significantly. Below 50% is even better.
A hygrometer, which you can buy for under $15 at any hardware store, tells you the exact humidity level in your home. Hang one in the most affected room and check it regularly. If your dehumidifier is running but humidity stays above 60%, the unit's undersized for the job or there's more moisture in the structure than it can handle.
Run your HVAC system
If your HVAC system is working and the affected area is served by it, run it. Air conditioning dehumidifies the air as part of its cooling cycle. Even in cool weather, running the fan in "on" mode (not "auto") circulates air through the ductwork and across wet surfaces.
Change your air filter, though. Excess moisture and disturbed debris during cleanup means more particulate in the air, and a clogged filter reduces airflow.
Clean and disinfect wet surfaces
For hard surfaces that got wet, wipe them down with a solution of one cup of household bleach to one gallon of water. This kills mold spores on the surface. Don't use bleach on porous materials like drywall or wood, because it doesn't penetrate and you're just bleaching the surface while mold grows underneath. For porous materials, antimicrobial sprays designed for mold prevention (available at hardware stores, look for products containing quaternary ammonium compounds) work better because they penetrate the material.
If you're already seeing visible mold, stop. Don't scrub it, spray it, or try to remove it yourself. Disturbing a mold colony releases millions of spores into the air, spreading the problem to other areas. That's a job for professional mold remediation with containment and HEPA filtration.
Common Mistakes That Make Water Damage Worse
After 15 years of walking into water-damaged homes, we've seen every mistake in the book. Here are the ones that cost homeowners the most time and money.
Leaving wet carpet padding in place
This is the number one mistake. The carpet on top dries and the homeowner assumes everything is fine. Meanwhile the padding underneath is holding water against the subfloor like a wet sponge. By the time you smell the mold, it has been growing for weeks.
Turning off fans and dehumidifiers too early
Homeowners run equipment for a day or two, things feel dry, and they turn everything off. But interior materials like wall cavities, subfloor, and concrete hold moisture much longer than surfaces. Run drying equipment until a moisture meter confirms readings are at acceptable levels. Not until things feel dry. Until they measure dry.
Painting over water-damaged drywall
We see this more than we should. The drywall has a water stain, the homeowner paints over it, and assumes the problem is solved. Paint seals moisture inside the drywall. Now it can't evaporate outward and the only direction for the moisture to go is into the wall cavity. Mold follows within weeks.
Not checking adjacent rooms
Water follows gravity and the path of least resistance. A leak in the bathroom may have traveled under the wall and into the bedroom closet. A kitchen flood may have found its way under the cabinets, through the subfloor, and into the basement ceiling below. Always check rooms adjacent to and below the water source.
Assuming the problem is small because the visible water was small
A slow drip under a sink can soak an entire subfloor section and travel behind the walls into adjacent rooms. The water you see is often a fraction of the water you have. If you find wet areas farther from the source than expected, the problem is bigger than it looks and likely needs professional assessment.
Understanding Water Categories and Why They Matter for Drying
The type of water determines whether DIY drying is safe. The IICRC classifies water damage into three categories based on contamination level.
| Category | Source Examples | DIY Safe? | Key Concerns |
|---|---|---|---|
| Category 1 (Clean) | Broken supply line, leaking faucet, rain leak | Yes, for small events | No immediate health risk; safe with basic precautions |
| Category 2 (Gray) | Washing machine drain, dishwasher discharge, toilet overflow (urine only) | Limited -- use gloves and boots | Contains contaminants; disinfect all surfaces after drying |
| Category 3 (Black) | Sewage backup, outdoor flood water, water sitting 72+ hours | No -- call professionals | Dangerous pathogens; requires PPE, antimicrobial treatment, disposal protocols |
Water categories degrade over time. Category 1 water that sits for 48 hours becomes Category 2. Category 2 left for 72 hours becomes Category 3. Speed matters. For the complete breakdown, read our water damage categories reference guide.
Frequently Asked Questions About Drying Out a Water Damaged Home
With household fans and a dehumidifier, expect three to seven days for surfaces and up to two weeks for wall cavities and subfloors. The timeline depends on how much water was involved, what materials are wet, and what equipment you're running. Professional equipment typically cuts drying time roughly in half by using commercial-grade dehumidifiers and targeted airflow systems.
Yes, for small, clean water events like a minor appliance leak or a small pipe drip that you catch quickly. You need a dehumidifier, fans, and patience. Large-scale damage, contaminated water, or situations where water sat for more than 24 hours generally need professional equipment and expertise to prevent mold and structural damage.
Remove baseboards to expose the bottom edge of the drywall. Point fans along the wall surface to promote evaporation. Run a dehumidifier in the room. This approach works for minor wetting where the drywall is still structurally sound. If the drywall is soft, crumbling, or was submerged, removal is usually necessary. Professional crews also use injectidry systems that force dry air into wall cavities through small holes, which can dry walls without demolition.
Only if outdoor humidity is below 50%. In humid climates or during rain, opening windows adds moisture to the indoor environment and slows drying. In most situations, closing windows and running a dehumidifier is more effective. Check the outdoor humidity with a weather app before deciding.
Use a pin-type moisture meter to check the wall at multiple heights. Wood framing should read below 16% moisture content. Drywall should read below 1% on a relative scale. Don't rely on how the surface feels -- interior moisture can persist long after the surface seems dry. If readings aren't dropping after three days of active drying, call a professional for assessment. For signs of hidden water damage, see our signs of water damage guide.
Most homeowners insurance covers sudden and accidental water damage, including the cost of professional drying. If a pipe bursts, an appliance overflows, or a supply line fails, your policy typically covers extraction and drying. Gradual damage from slow leaks or poor maintenance is usually not covered. We bill your insurance company directly and handle the documentation.
Small amounts of moisture in well-ventilated areas can eventually evaporate without equipment, but it takes significantly longer and increases mold risk. Building materials like drywall, carpet padding, and subfloor hold moisture that doesn't evaporate without active air movement and dehumidification. Relying on natural drying for anything beyond a minor surface dampness is risky.
Professional drying typically ranges from $1,000 to $4,000 depending on the affected area and number of equipment days. This covers placement and monitoring of industrial dehumidifiers and air movers. For complete cost details including extraction, drying, and repair, see our water damage restoration cost guide. Most sudden water damage is covered by insurance.
Household fans and dehumidifiers work on surface moisture and open air. Professional structural drying uses the science of psychrometry, meaning the relationship between temperature, humidity, and airflow, to extract moisture from inside building materials. Commercial equipment operates at volumes and efficiency levels that household tools can't match, and daily moisture monitoring ensures nothing is missed.
Call when the damage covers more than one room, the water was contaminated (sewage, flood water), water sat for more than 24 hours, you smell mold, or your moisture meter shows readings that aren't dropping after two to three days of DIY drying. For any water damage where you're unsure, call (844) 426-5801 for a damage assessment. It takes 30 minutes and tells you exactly what your home needs.
Take Action Now: Your Home Is Not Going to Dry Itself
Water damage gets worse with time, not better. Every hour that moisture sits in your walls, floors, and subfloor increases the damage, raises the cost of repair, and brings you closer to a mold problem that turns a drying job into a full remediation project. The steps in this guide give you a real head start, remove standing water, get fans and dehumidifiers running, pull baseboards, remove carpet padding, and monitor moisture levels.
But here's the reality we see every week. Homeowners who catch it early, dry aggressively, and get professional moisture readings when they are unsure come out of water damage events with minimal cost and no secondary damage. Homeowners who half-dry, assume things are fine, and wait to see what happens end up calling us six weeks later with mold behind their walls and a restoration bill three times what the original drying would have cost.
If you have water damage right now and you're not sure whether your DIY efforts are enough, call (844) 426-5801. Our IICRC-certified team will assess the damage, take moisture readings, and give you an honest answer about what your home needs.
We respond within 60 minutes, 24/7, and we work with all major insurance carriers with direct billing. You don't have to figure this out alone.