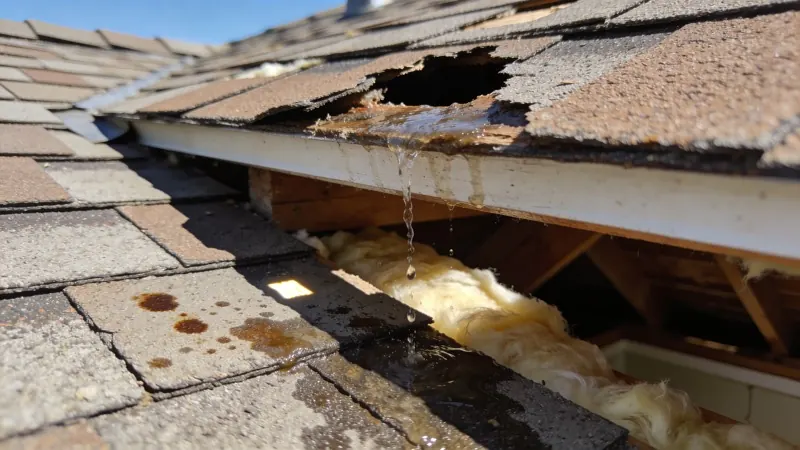
You come home from work and there's a brown circle on your bedroom ceiling that was not there this morning. Or worse, you wake up at 2 AM to the sound of dripping and find water pooling on your hardwood floor underneath a light fixture. You look up and the ceiling drywall is dark, wet, and starting to sag.
Roof leak water damage is something our crews respond to year-round, but the calls spike hard after spring storms, during summer hail season, and through the winter freeze-thaw cycle in northern states. After 15 years of restoration work, we can tell you that roof leaks are uniquely frustrating because the damage is often extensive before anyone notices it. Water enters through a breach in the roofing material, travels through the attic, soaks insulation, and saturates ceiling framing. By the time a stain shows up on your ceiling, that water has been working its way through layers of material for days, weeks, or sometimes months.
This guide covers every type of roof leak we deal with, from shingle failures and flashing problems to ice dams and storm damage. We'll walk through how water travels through your roof assembly, what it damages along the way, how attic inspection works, when emergency tarping is needed, and how storm damage insurance claims differ from standard water damage claims.
If water is coming through your ceiling right now from a roof breach, call (844) 426-5801 and get our crew moving. We arrive within 60 minutes and can tarp the roof to stop further intrusion while we begin water extraction and drying inside.
How Roof Leaks Happen: Shingle Damage, Flashing Failure, and Worn-Out Roofing Materials
Every roof has a limited lifespan and a lot of potential failure points. Understanding where leaks originate helps you understand why the damage below can be so far from the entry point above.
| Leak Source | How It Fails | Detection Difficulty | Typical Damage Pattern |
|---|---|---|---|
| Shingle damage / wind uplift | Adhesive strip breaks, tabs lift or tear off | Easy (visible from ground) | Localized attic entry, spreads along rafters |
| Flashing failure | Sealant cracks around penetrations | Hard (slow, hidden leaks) | Chronic moisture around chimneys, vents, skylights |
| Valley / ridge deterioration | Debris dams water, UV degrades ridge caps | Moderate | Water travels long distances from entry point |
| Ice dams | Meltwater backs up under shingles at eaves | Moderate (seasonal) | Perimeter damage along eave line |
| Wind-driven rain | Lateral rain bypasses vents and baffles | Hard (intermittent) | Ridge line and gable-end moisture |
Shingle damage and wind uplift
Asphalt shingles, which cover roughly 80% of residential roofs in the United States according to the Asphalt Roofing Manufacturers Association, fail in predictable ways. High wind lifts shingle tabs, breaks the adhesive seal strip, and either folds the shingle back or tears it off entirely. Once the seal strip breaks on an asphalt shingle, that tab never re-seals. It lifts every time the wind blows, and rain gets underneath.
We see this constantly on roofs that are 12 to 20 years old. The adhesive strip hardens and becomes brittle as shingles age. A storm with 50-mph gusts might not damage a 5-year-old roof at all, but the same storm will peel tabs off a 15-year-old roof in dozens of spots.
Each lifted or missing shingle exposes the underlayment and roof decking beneath. If the underlayment is also aged and brittle, water goes straight through to the sheathing.
What we typically see: Three-tab shingles fail more often than architectural (dimensional) shingles because they have less adhesive surface area and are thinner. Architectural shingles have a stronger bond and more mass, but they still fail at edges, hips, and ridges where wind loading is highest. The perimeter of the roof and the ridge line take the most wind damage on most houses.
Flashing failures around penetrations
Flashing is the metal or rubber material that seals the joints between the roofing material and anything that penetrates or intersects the roof surface: chimneys, plumbing vent pipes, skylights, dormers, and valleys where two roof planes meet.
In our experience, flashing failures cause more chronic roof leaks than shingle damage does. A missing shingle after a storm creates an obvious, sudden leak. A flashing failure is sneakier. The sealant around a plumbing vent boot cracks and separates over the years.
Water gets in during heavy rain but not light rain. The homeowner might not notice for months because the water is going straight into the attic, soaking insulation, and the ceiling stain doesn't appear until the drywall is thoroughly saturated.
Chimney flashing is particularly problematic. The joint between the chimney masonry and the roof has two components: step flashing along the sides and counter-flashing embedded in the mortar joints. When the caulk at the counter-flashing fails or the mortar cracks, water runs down the inside of the chimney chase and into the attic. We've opened up areas around chimneys and found years of accumulated water damage on framing members that the homeowner had no idea existed.
Valley and ridge deterioration
Roof valleys, where two sloping planes meet, channel the most water during rain. The valley flashing or woven shingle valley takes constant water flow and debris accumulation. Leaves and pine needles pile up in valleys, creating small dams that force water sideways under the shingles.
Ridge caps, the shingles that cover the peak of the roof, are exposed to the most wind and UV radiation. They curl and crack before the field shingles do. When a ridge cap fails, water enters at the highest point of the roof and can travel a long distance down the sheathing and rafters before finding a point to drip through into the living space.
Water's Path Through Your Roof Assembly: Why Damage Spreads Far From the Leak
This is the part that surprises most homeowners. You find a ceiling stain in the master bedroom, and you assume the roof leak is directly above that spot. Sometimes it is. More often, the leak is 5, 10, or even 15 feet away on the roof surface, and the water traveled horizontally through the attic before dripping down.
How water moves through an attic
When water gets past the roofing material, it hits the roof sheathing, typically 7/16-inch or 1/2-inch oriented strand board (OSB) or plywood. If the sheathing has seams, the water follows those seams. If the sheathing is solid in that area, water runs downhill along the underside of the sheathing until it hits a rafter.
At the rafter, one of two things happens. The water either drips off the bottom edge of the sheathing onto whatever is below (usually insulation sitting on the ceiling drywall), or it follows the rafter down. Water following a rafter can travel the full length of that rafter before dropping off at the bottom into the soffit area or onto the top plate of the wall.
This is why a roof leak at the ridge line can produce a ceiling stain halfway across the room. The water rode a rafter down 8 or 10 feet before it hit a joist intersection and dripped through.
What gets damaged along the way
Roof sheathing. OSB is particularly vulnerable to water. Unlike plywood, which has cross-laminated layers that resist moisture penetration, OSB is made of compressed wood strands bonded with resin. When OSB absorbs water, it swells, delaminates, and loses structural integrity. We've pulled back shingles on repair jobs and found sheathing so deteriorated from chronic leaks that you could push your finger through it.
Insulation. Fiberglass batt insulation sitting on the ceiling drywall is directly in the path of any water dripping from above. Wet fiberglass compresses and loses its R-value. Blown cellulose insulation absorbs water and becomes a heavy, soggy mass that sits on top of the drywall, keeping it wet and accelerating deterioration. Neither type dries well in place.
Ceiling joists and rafters. Wood framing members absorb water over time. Short-term exposure during a single storm event usually doesn't cause structural concern. But a chronic leak that has been wetting the same rafter or joist for months can lead to wood rot, especially at connection points where moisture sits in the joint and doesn't dry. We check every framing member with a moisture meter and probe suspected areas with an awl. Soft, punky wood needs to be sistered or replaced.
Ceiling drywall. Water-saturated drywall loses its structural integrity. The paper facing on standard drywall is a food source for mold. When drywall absorbs water from above, the paper facing on the attic side gets wet first, and mold can establish there long before you see any sign on the finished side below. A ceiling stain that has been growing slowly over weeks almost certainly has mold on the backside of the drywall.
Jennifer's ranch house after the April storm. Jennifer called us two days after a severe thunderstorm with 60-mph winds tore through her neighborhood. She had a ceiling stain in the hallway and a small drip in the master bedroom closet. When we got into the attic, the actual damage was far worse than what showed below. Three ridge cap shingles were missing, and water had entered along approximately 20 feet of ridge line.
The water followed the sheathing and rafters in multiple directions. We found wet insulation across almost 400 square feet of attic space, including areas where no ceiling staining was visible below. The blown cellulose insulation was holding water against the ceiling drywall, and early-stage mold had started on the backside of the drywall in two areas.
The entire repair required insulation removal in the affected zone, structural drying, drywall replacement in the hallway and closet, mold treatment on two ceiling joist bays, and new insulation. The roof itself needed new ridge caps and repair to the damaged sheathing underneath. Jennifer's insurance covered the storm damage, and our documentation made the claim straightforward.
Ceiling Stain From a Roof Leak?
The damage in your attic is almost always worse than the stain below. Our IICRC-certified team inspects, dries, and restores. On-site within 60 minutes.
📞 Call (844) 426-5801Ice Dam Water Damage: A Winter-Specific Roof Leak Problem
Ice dams deserve their own section because the mechanism is different from standard roof leaks, the damage pattern is different, and the prevention approach is different. If you live in a northern climate, ice dams are likely the single biggest winter water damage risk to your home.
How ice dams form
An ice dam forms when heat escaping from your living space through the attic warms the roof surface unevenly. The snow on the upper portion of the roof, above the heated living space, melts. That meltwater runs down the roof toward the eaves.
The eaves extend past the exterior wall, so there's no heat below them. The meltwater refreezes at the eaves, forming a ridge of ice.
As the cycle continues, the ice ridge grows. Meltwater from above backs up behind the dam. That standing water has nowhere to go except sideways and under the shingles.
Once water gets under the shingles, it penetrates the underlayment, soaks the sheathing, and drips into the soffit and the exterior wall cavity below. In severe cases, it reaches the attic and the ceiling.
According to FEMA, ice dams are among the leading causes of winter water damage in the northern United States, affecting homes from the Northeast through the Upper Midwest.
Where ice dam damage shows up
Ice dam water damage has a distinctive pattern. Unlike a storm leak that enters at one point, ice dam damage typically runs along the perimeter of the home at the eave line. The damage shows up in these specific locations:
- Soffit and fascia. Water running behind the ice dam soaks into the soffit material and can rot the fascia board. Peeling paint along the eave line in spring is often an ice dam indicator.
- Exterior wall cavities. Water that gets past the eaves drips into the top of the exterior wall, inside the wall cavity. This is some of the most destructive hidden damage we find. The water soaks studs, insulation, and the interior drywall from behind. Homeowners notice bubbling paint or soft spots on walls near the ceiling line months later.
- Attic perimeter. The insulation along the outer edges of the attic, right above the exterior walls, gets soaked. This area already tends to have thinner insulation (the eave angles limit how much insulation fits), and wet insulation at the eaves makes the heat loss problem worse, which feeds the ice dam cycle.
- Ceiling perimeter. Stains along the edge of the ceiling where it meets the exterior wall are a classic ice dam indicator.
Tom and Diane's colonial in New Hampshire. They had dealt with small ice dams for years, usually just icicles at the gutters. In January, after a 3-foot snowstorm followed by a week of sunny days with below-freezing nights, they got the ice dam of a lifetime. The dam built up 2 feet thick along the entire north-facing eave. Water started seeping in along the top of the north bedroom wall.
By the time they called us, the bedroom wall had bubbling paint, and they could see wet spots on the ceiling along the wall line. Our inspection found water inside the exterior wall cavity across a 20-foot section. The insulation in the wall was saturated. The bottom plate of the wall framing was sitting in standing water in the stud cavities.
In the attic above, the perimeter insulation was a wet, compressed mass. We had to open the wall from inside, remove wet insulation, dry the framing with wall cavity drying equipment (injectidry panels), replace insulation, and repair drywall. The attic needed complete insulation replacement along the eave. Total scope was considerably larger than Tom and Diane expected from what looked like a "small leak along the wall." After restoration, we recommended adding proper ventilation baffles and increasing attic insulation to reduce heat loss, the root cause of their ice dam problem.
Preventing ice dam damage
Ice dam prevention is really about addressing the heat loss that causes them. This isn't our core service, but after handling hundreds of ice dam damage jobs, we always share this guidance:
- Air sealing the attic floor. Gaps around ceiling light fixtures, plumbing penetrations, attic hatches, and wire chases allow heated air to rise into the attic. Sealing these gaps reduces the heat that melts snow on the roof.
- Adding insulation. The Department of Energy recommends R-49 to R-60 attic insulation in northern climate zones. Many older homes have R-19 or less. More insulation means less heat transfer to the roof surface.
- Ensuring proper ventilation. Ridge vents and soffit vents create airflow that keeps the roof surface cold and uniform. Without ventilation, warm air pools in the attic and heats the sheathing unevenly.
- Ice and water shield underlayment. During a roof replacement, ice and water shield membrane should be installed from the eave edge to at least 24 inches past the interior wall line. This self-sealing membrane is the last line of defense when water does back up under the shingles.
Attic Inspection After a Roof Leak: What We Look For and Why It Matters
Every roof leak damage job starts with an attic inspection, and this is where we find the information that determines the real scope of the project. What you see on your ceiling below is the tip of the iceberg.
Tracing the water path
We enter the attic with moisture meters, a thermal imaging camera, and a strong flashlight. The first objective is finding the entry point where water gets past the roofing material. We look for:
- Daylight visible through the sheathing (holes, gaps, or missing material)
- Water staining on the underside of sheathing, typically appearing as dark streaks or discoloration
- Wet areas on rafters, especially at joints and where rafters meet the ridge board
- Mineral deposits or white staining that indicate repeated wetting and drying cycles
- Rust on nail tips protruding through the sheathing, which condense moisture and indicate ongoing humidity issues
Tracing from the ceiling stain upward, we follow the moisture trail backward. A moisture meter pressed against rafters and sheathing gives us readings that map where water has been. Wood that reads above 20% moisture content has been wet recently. Wood that reads above 28% is actively saturated.
Assessing insulation damage
Every type of attic insulation responds differently to water:
| Insulation Type | Water Absorption | Dries in Place? | Must Remove When Wet? |
|---|---|---|---|
| Fiberglass batts | Compresses, loses R-value | Poorly | Yes (usually) |
| Blown cellulose | Absorbs heavily, becomes dense mass | No | Yes (always) |
| Open-cell spray foam | Some absorption | Yes (more readily) | Case-by-case |
| Closed-cell spray foam | Minimal absorption | Yes | Rarely |
Fiberglass batts compress when wet and don't bounce back. The air pockets that give fiberglass its insulating value collapse. A fiberglass batt that was R-30 when installed performs at a fraction of that when wet. Even after it dries, the fibers often remain compressed. We pull wet batts and check the drywall and joists beneath.
Blown cellulose is treated paper fiber. It absorbs water readily and becomes a dense, heavy mass. Wet cellulose sitting on drywall holds moisture against the paper facing and dramatically increases mold risk. Cellulose must be removed when it gets wet. There's no practical way to dry it in place.
Spray foam insulation (both open-cell and closed-cell) handles water differently. Closed-cell foam barely absorbs water at all. Open-cell foam can absorb some moisture but dries more readily than fiberglass or cellulose. The concern with spray foam is that it can mask the water path, making it harder to trace where the leak entered and where water traveled.
Checking structural framing
For recent storm damage with a short exposure time, the framing is usually fine from a structural standpoint. The bigger concern with framing is chronic leaks that have been wetting the same members repeatedly.
We probe suspect areas with an awl. Solid wood resists the probe. Rotted wood gives way. Connection points are the highest-risk areas: where rafters meet the ridge board, where rafters meet the top plate, and where ceiling joists are nailed to rafters. These joints trap moisture and resist drying.
Framing that shows early decay can sometimes be treated with a borate-based preservative and monitored. Framing with significant rot or structural compromise needs to be sistered (a new member bolted alongside the damaged one) or replaced entirely.
Emergency Roof Tarping: Stopping the Leak Before Permanent Repair
When a storm damages your roof and more rain is coming, the priority is stopping water from entering the building. Permanent roof repair might take days or weeks to schedule, especially after a widespread storm event when every roofer in the area is booked. Emergency tarping bridges that gap.
How professional roof tarping works
Our crew secures a heavy-duty polyethylene tarp (minimum 6-mil thickness, preferably 10-mil or thicker for storm damage) over the damaged section. Here's the process:
- Assess the damage from the ground and attic first. We identify the breach location and the extent of missing or damaged material before anyone goes on the roof.
- Tarp sizing. The tarp must extend at least 4 feet beyond the damaged area on all sides. For ridge damage, the tarp goes over the ridge and down the other side.
- Securing the tarp. We use 2x4 lumber battens along the tarp edges, screwed through the tarp and into the roof sheathing. Sandbags are used along eaves and on low-slope sections. The tarp must be tight against the roof surface so wind can't get underneath and peel it off.
- Sealing the perimeter. Edges are tucked and sealed to prevent wind-driven rain from getting under the tarp.
A properly installed emergency tarp can protect a damaged roof for weeks to months until permanent repair happens. A poorly installed tarp, one that's too small, loosely secured, or not wrapped over the ridge, will fail in the next storm and sometimes causes more damage when the wind catches it and peels it back.
When tarping is and isn't enough
Tarping stops new water from entering. It doesn't address the water that already got in. If a storm sent water through your roof and into the attic, the insulation, sheathing, framing, and possibly the ceiling below are wet right now. Tarping the roof protects against additional rain, but you still need extraction and drying for the water that already penetrated the structure.
This is why our roof leak response addresses both the exterior and interior. We tarp the roof to stop the intrusion and simultaneously begin drying operations inside the attic and living space. Waiting until the roof is permanently repaired before addressing the interior moisture means that insulation, drywall, and framing sit wet for days or weeks, and mold can establish in that time. Our structural drying process begins immediately regardless of when permanent roof repair is scheduled.
Wind-Driven Rain Damage: When the Roof Is Intact but Water Still Gets In
Not every roof-related water intrusion involves missing shingles or damaged flashing. Wind-driven rain is a specific condition where heavy rain combined with strong wind forces water laterally through gaps and seams that would stay dry during normal rainfall.
Where wind-driven rain penetrates
Wind-driven rain finds vulnerabilities that vertical rain never tests. Common penetration points include:
- Ridge vents. Many ridge vent designs allow water intrusion during horizontal rain. The louvers or baffles that normally prevent rain entry are bypassed when wind pushes rain sideways. We see attic moisture at the ridge line after storms even when no shingles are damaged.
- Gable vents. Louvered gable vents facing the windward side of a storm let rain in directly. The louvers deflect downward-falling rain but not horizontal rain.
- Soffit vents. Wind blowing rain upward into soffit vents deposits water in the attic perimeter, right above the exterior wall. This mimics ice dam damage patterns.
- Dormer and sidewall junctions. Where a dormer wall meets the roof surface, step flashing can allow wind-driven rain past the seam. The same applies to any wall-to-roof junction.
Rich's cape cod after Hurricane Lee's remnants. Rich lives 200 miles inland from the coast, but the remnants of Hurricane Lee brought sustained 45-mph winds with heavy rain for 18 hours. He had no missing shingles, no obvious roof damage. But the next morning, he found water stains on the ceiling in both upstairs bedrooms, which sit under the slope of the roof.
Our inspection found water intrusion through the ridge vent along almost the entire ridge line. The sustained lateral wind had pushed rain through the ridge vent baffles for hours. The insulation along the ridge was soaked for the full length of the house. The drywall in the upstairs knee walls had absorbed moisture.
There was nothing wrong with Rich's roof in the conventional sense. No missing shingles, no flashing failure. The ridge vent simply wasn't rated for that level of wind-driven rain. After drying and insulation replacement, Rich upgraded to a ridge vent with a more effective rain baffle design.
Storm Damage Insurance Claims for Roof Leak Water Damage
Storm damage claims for roof leaks follow a specific process, and understanding it beforehand makes the difference between a smooth claim and a drawn-out fight with your carrier.
What qualifies as storm damage
Insurance policies cover "sudden and accidental" damage from covered perils. For roof leaks, the covered perils typically include:
- Wind damage (shingles blown off, flashing torn, debris impact)
- Hail damage (shingle bruising, cracked tiles)
- Falling objects (tree limbs on the roof)
- Weight of ice and snow (in some policies, structural damage from snow load)
The resulting water damage inside the home is covered as a consequence of the covered peril. If wind ripped off shingles and rain entered through the gap, the interior water damage is part of the storm damage claim.
What doesn't qualify
- A roof that has deteriorated over 20 years and finally leaks. That's maintenance neglect, not a covered peril.
- A chronic leak you knew about but didn't repair. The failure to mitigate further damage can actually void your claim for subsequent damage.
- Normal wear and aging. Your policy covers damage from events, not the gradual aging of materials.
- Flood damage from rising water. That requires a separate flood insurance policy through the National Flood Insurance Program (NFIP) or a private flood carrier.
How we document storm damage claims
Our documentation package for storm damage includes everything your adjuster needs to process the claim:
- Timestamped exterior photos showing the roof damage, missing shingles, damaged flashing, and the condition of surrounding roofing material
- Attic photos showing water entry points, wet insulation, staining on framing, and any mold present
- Interior photos documenting ceiling stains, drywall damage, floor damage, and affected contents
- Moisture readings mapped to specific locations in the attic and living space, taken on initial assessment and daily during drying
- Scope of work detailing every material to be removed, dried, treated, or replaced
- Equipment log listing all drying equipment, placement, and run time
- Drying log showing daily moisture readings demonstrating progress toward dry standard
This level of documentation is what separates a claim that gets approved at full scope from one where the adjuster knocks down the estimate because "it doesn't look that bad." The moisture data and photo documentation prove the full extent of damage that's not visible from a casual inspection. For a detailed walkthrough of the insurance process, see our water damage insurance claim guide.
The roofing and restoration coordination problem
Here's something most homeowners don't think about until they're in the middle of it: after a storm, you need two different types of work done. You need a roofer to repair or replace the damaged roofing material. And you need a restoration company to deal with the water damage inside.
These are different trades, different scopes of work, and sometimes different insurance claim line items.
We handle the interior damage, the water extraction, drying, insulation replacement, drywall repair, and mold treatment. We coordinate with your roofer on timing so that our work doesn't conflict. What we recommend is getting the roof tarped immediately (we can do this), then starting interior drying right away while the roofing repair is scheduled. Waiting for the roof to be permanently fixed before addressing interior moisture is the most common mistake we see homeowners make after storm damage.
Storm Damage? We Handle the Interior Restoration
Emergency tarping, attic drying, insulation replacement, ceiling repair, and insurance documentation. All from one team.
📞 Call (844) 426-5801The Restoration Process for Roof Leak Water Damage
Here's what happens from the moment you call us to the point where your home is restored to pre-loss condition.
Step 1: Emergency response and containment
When you call (844) 426-5801, we dispatch a crew immediately. On arrival, we:
- Assess the situation, is the roof still actively leaking? Is the ceiling at risk of collapse? Are there electrical hazards from water near light fixtures or wiring?
- If the roof is still leaking and more rain is forecast, we tarp the damaged section.
- Place containment to catch active drips and protect flooring and contents.
- If the ceiling is sagging with trapped water, we perform a controlled drain by puncturing the lowest point of the bulge and catching the water. This controlled release prevents an uncontrolled ceiling collapse.
Step 2: Attic inspection and moisture mapping
We get into the attic and map the damage. Moisture meters and thermal imaging show us the full extent of water penetration, which is always more than what the ceiling stain below suggests. We document every wet surface, every affected area of insulation, and every framing member with elevated moisture readings.
Step 3: Insulation removal
Wet insulation comes out. Our crew removes saturated fiberglass batts or wet blown cellulose from the affected area. This isn't optional. Leaving wet insulation in place dramatically extends the drying time and keeps moisture trapped against the ceiling drywall and framing. The insulation removal also gives us clear access to the ceiling drywall and joists for drying and inspection.
Step 4: Structural drying
With the insulation removed, we set up industrial air movers and LGR dehumidifiers to dry the attic space, including rafters, sheathing, and ceiling joists. In the living space below, we position equipment to dry the ceiling drywall from the finished side. Daily moisture readings track drying progress. Our target is getting all wood framing below 16% moisture content and drywall below 1% on a relative scale.
This phase typically takes 3 to 5 days for a standard roof leak. Heavy saturation or involvement of dense materials like concrete or hardwood may extend the timeline.
Step 5: Mold assessment and treatment
If the leak was chronic or if it has been more than 48 hours since the water entered, we check for mold on the backside of the drywall, on framing surfaces, and on the sheathing. Early-stage mold growth can be treated with antimicrobial agents applied to the affected surfaces. Established colonies may require our mold remediation protocol with containment and HEPA filtration.
Step 6: Material replacement and finish work
Once everything is dry and clear of mold, we replace what was damaged:
- Saturated ceiling drywall sections are cut out and replaced, with seams taped, mudded, and sanded
- Ceiling texture is matched to the existing finish, whether that's knockdown, orange peel, smooth, or another pattern
- Stain-blocking primer is applied before paint to prevent water stain bleed-through
- New insulation is installed to restore the attic R-value
- Any damaged sheathing or framing that was identified during inspection is repaired or replaced
Step 7: Documentation and claim support
Throughout the project, we compile the documentation package described in the insurance section above. If your insurer has questions about the scope, our project manager communicates directly with the adjuster. We bill your insurance carrier directly in most cases, so you're not fronting the full restoration cost. For details on what to expect from the claims process, visit our insurance claim guide.
What Homeowners Should Do Immediately After Discovering a Roof Leak
While you wait for our crew to arrive, here are the steps you can take safely:
- Move furniture, electronics, and valuables away from the drip area. Get anything important out from under the wet ceiling.
- Place buckets or containers under active drips. Put old towels around the base to catch splatter.
- If the ceiling is bulging, puncture the lowest point of the bulge. Use a screwdriver or nail pushed through the drywall. Hold a bucket underneath. This controlled drainage prevents uncontrolled collapse.
- Turn off electricity to the affected room if water is near light fixtures, outlets, or wiring. Go to your breaker panel and flip the breaker for that room. Don't touch switches or outlets in the wet area.
- Don't go on the roof during a storm or on a wet roof. Rooftop falls are a leading cause of homeowner injury. Leave roof access to professionals.
- Document the damage with photos and video. Photograph the ceiling stain, any active dripping, and any damage to contents. This supports your insurance claim.
- Call your insurance company to report the claim, and call us at (844) 426-5801 to get the restoration process started.
For more on what to do before our team arrives, see our water damage cleanup guide.
Roof Leak Water Damage Costs: What to Expect
The cost of roof leak water damage repair depends on the extent of the interior damage, not just the roof repair itself. Here are realistic ranges from jobs we've handled:
| Damage Level | Typical Scope | Cost Range | Drying Time |
|---|---|---|---|
| Small, contained | One ceiling area, limited attic damage | $1,500 - $3,500 | 3-4 days |
| Moderate | Multiple ceiling areas, extensive insulation removal | $3,500 - $7,500 | 4-5 days |
| Major storm damage | Multiple rooms, widespread attic saturation | $7,500 - $15,000+ | 5-7 days |
Small, contained leak (one ceiling area, limited attic damage): $1,500 to $3,500. This is a single penetration point that was caught relatively quickly. Limited insulation damage, one section of ceiling drywall to replace, 3 to 4 days of drying. No mold.
Moderate leak with significant attic involvement: $3,500 to $7,500. Multiple ceiling areas affected, extensive insulation removal and replacement, 4 to 5 days of drying, possible mold treatment on limited areas.
Major storm damage with widespread attic saturation: $7,500 to $15,000+. Multiple rooms, extensive insulation replacement, structural drying across a large area, drywall replacement in multiple rooms, mold remediation if the leak was prolonged. This is what we see after severe storms where significant roof sections were compromised.
These ranges cover the interior restoration work. The roofing repair or replacement is a separate cost handled by your roofing contractor. Both the interior restoration and the roofing work are typically covered under the same storm damage insurance claim. For a complete breakdown of restoration pricing, see our water damage repair cost guide.
Frequently Asked Questions About Roof Leak Water Damage
A roof leak can cause visible water damage within hours during heavy rain. A small, slow leak during light rain may take weeks or months to produce a visible ceiling stain. The damage that matters most happens before you see anything. Insulation gets waterlogged, sheathing absorbs moisture, and mold can start growing on organic materials within 24 to 48 hours of the first water intrusion.
Homeowners insurance typically covers water damage caused by a sudden roof breach, such as a tree limb punching through during a storm or shingles ripped off by high winds. It generally doesn't cover damage from long-term roof deterioration or deferred maintenance. If your 20-year-old roof has been leaking for months and you never addressed it, the carrier will likely classify that as a maintenance failure. Storm damage claims have stronger approval rates than gradual leak claims.
Yes, and the attic is one of the most common places we find mold after a roof leak. Attics are dark, poorly ventilated in many homes, and full of organic material like wood sheathing and paper-faced insulation. When roof leak moisture gets trapped up there, mold colonies can establish within days. If you suspect attic mold from a past or current roof leak, our mold remediation team can test and treat the space.
Start in the attic with a flashlight during or right after rain. Look for wet spots, staining on the underside of the roof sheathing, and daylight coming through. Water often enters at one point and travels along rafters or sheathing before dripping down, so the ceiling stain below may be several feet from the actual entry point. On the exterior, inspect flashing around chimneys, vent pipes, skylights, and valleys where two roof planes meet.
If it's safe to access your roof and more rain is expected, yes. A properly secured tarp prevents additional water from entering while you wait for permanent repair. Use a tarp that extends at least 4 feet past the damage on all sides, secure it with 2x4 battens or sandbags, and wrap it over the ridge if possible. Never get on a wet roof or a roof during active storms. Call (844) 426-5801 and our crew can tarp the roof as part of emergency response.
Roof leak water damage repair costs depend on how much water entered and how long it sat. Drying and repairing a small section of ceiling with limited attic damage typically runs $1,500 to $3,500. Larger areas requiring insulation replacement, multiple drywall sections, and extended drying can reach $5,000 to $10,000. If mold developed from a prolonged leak, add mold remediation costs. See our cost guide for detailed breakdowns.
On ceilings, roof leak damage appears as brownish-yellow stains, often with irregular edges or ring patterns. Paint may bubble or peel. In more advanced cases, the ceiling drywall sags or feels soft when pressed. In the attic, you'll see darkened or stained wood on rafters and sheathing, wet or compressed insulation, and potentially mold growth on wood surfaces. Exterior signs include missing or curled shingles, damaged flashing, and staining on fascia boards.
It depends on the insulation type and how wet it is. Fiberglass batts that got soaked won't dry effectively in place because the compressed fibers trap moisture against the ceiling drywall and framing. Blown cellulose holds moisture like a sponge and must be removed when wet. Spray foam insulation can sometimes be dried in place because it doesn't absorb water the same way. In our experience, removing wet insulation is almost always the right call. Trying to dry through it extends the drying timeline and increases mold risk.
With professional drying equipment, including industrial dehumidifiers and air movers, most roof leak water damage dries within 3 to 5 days after wet insulation is removed. If the sheathing and rafters are heavily saturated, add 1 to 2 additional days. Without professional equipment, attic spaces can stay damp for weeks because most attics have poor air circulation. Our team monitors moisture daily and documents readings for your insurance claim.
When a Roof Leak Needs Emergency Restoration vs. When It Can Wait
Not every roof leak is an emergency, and we think it's important to be honest about that.
Call immediately if:
- Water is actively dripping through the ceiling
- The ceiling is sagging or bulging with trapped water
- Water is near electrical fixtures, outlets, or wiring
- Multiple areas of the ceiling are showing new stains after a storm
- You smell a musty odor that was not there before, which suggests hidden moisture and possible mold
Can wait until morning if:
- You found a dry, old stain that has not changed recently and there's no active leak
- A small drip from a known source is contained in a bucket and the source has been stopped
Even for non-emergency situations, don't wait more than 24 to 48 hours. Every day that moisture sits in your attic and ceiling is a day closer to mold growth and expanded damage.
Stop Roof Leak Damage Before It Spreads
Roof leak water damage is one of the most deceptive types of water damage we deal with. The stain on your ceiling is just the visible symptom of a problem that has been building in your attic, soaking insulation, wetting framing, and potentially growing mold in a space you never see. The longer water sits up there, the bigger the restoration project becomes.
If you have ceiling stains from a roof leak, water dripping through during storms, or damage from ice dams, call (844) 426-5801. Our IICRC-certified technicians arrive within 60 minutes, inspect the attic, tarp the roof if needed, and start drying immediately. We document everything for your insurance claim and bill your carrier directly.
Don't wait for the roofer. The roof repair can happen on its own timeline. The interior damage needs to be addressed now, before mold takes hold and turns a manageable restoration into a much larger project. Call us today, or visit our water damage restoration page to learn more about our complete restoration process.