Your floors are spongy. The baseboards are starting to warp. You ran fans for two days after the pipe burst, and the carpet feels dry on top, but something still smells off. You pull back a corner of the baseboard and the drywall behind it's dark, soft, and damp.
That's what happens when water damage gets surface-dried instead of structurally dried. And after 15 years of restoration work, we can tell you this is the scenario we walk into more than any other—homeowners who thought the problem was solved because the visible water was gone.
Structural drying is the process of removing moisture from building materials—wood framing, subfloor, drywall, concrete, plaster—down to safe levels using industrial equipment and the science of psychrometry. It's the difference between a home that dries properly in four days and one that grows mold inside its walls for the next six months.
If you have water damage and need professional structural drying services, call (844) 426-5801. Our IICRC-certified technicians arrive within 60 minutes with commercial drying equipment and begin moisture mapping your property immediately. We monitor moisture levels daily until every material reaches its dry standard, and we document the entire process for your insurance claim.
This page covers everything you need to know about structural drying: what it is, why it matters, how the equipment works, how long it takes for different materials, what the IICRC standards require, and what it costs. Whether you're dealing with a pipe burst, appliance overflow, roof leak, or basement flood, this guide explains exactly what professional water damage restoration crews do to dry your property and prevent secondary damage.
The Science Behind Structural Drying (Psychrometry Basics)
Most homeowners think drying is straightforward—point a fan at the wet area and wait. But professional structural drying is based on psychrometry, which is the science of how air, temperature, and moisture interact. Understanding even the basics explains why household fans don't work and why our industrial equipment does.
How moisture moves out of building materials
When drywall, wood, or concrete absorbs water, that moisture doesn't just sit there waiting for a breeze. It's held inside the material by physical forces—capillary action in wood grain, absorption into gypsum in drywall, hydration in concrete pores. Getting it out requires manipulating three things simultaneously: temperature, airflow, and humidity.
Here's the simplified version. Wet building materials release moisture into the surrounding air through evaporation. But evaporation only happens efficiently when the air around the material can actually absorb more moisture. If you're blowing humid air across a wet wall, the wall can't release its moisture because the air is already full. That's exactly what happens when you run a box fan in a closed room after a flood—the air gets humid, evaporation stalls, and the materials stay wet.
Professional structural drying works by creating an environment where evaporation happens as fast as possible across all affected materials at once. We do this with three coordinated systems:
- Air movers create high-velocity airflow across wet surfaces, which speeds up evaporation by constantly replacing the saturated air layer sitting on the material surface with drier air
- Industrial dehumidifiers pull moisture out of the air, keeping the relative humidity (RH) low so that wet materials can continue releasing moisture into the air
- Temperature control keeps the environment warm enough (ideally 70-90°F) for efficient evaporation—moisture moves slower in cold conditions
When these three factors are balanced correctly, building materials dry in days instead of weeks. When they aren't balanced—like when someone opens all the windows in February or runs household fans without dehumidification—the drying either stalls or takes so long that mold colonizes the wet materials before they dry out.
Why relative humidity matters more than you think
Relative humidity is the percentage of moisture the air is currently holding compared to the maximum it can hold at that temperature. At 50% RH, the air is half-full. At 90% RH, it's nearly saturated and can't absorb much more.
After water damage, the RH inside an affected room can spike to 80-95%. At those levels, building materials can't release moisture—there's nowhere for it to go. Our target during structural drying is to keep the RH below 40-50% in the affected area. That creates what we call a "vapor pressure differential" between the wet material and the surrounding air, which is the driving force behind evaporation.
We measure RH constantly using thermo-hygrometers and adjust our equipment placement based on those readings. If the RH is climbing, we add dehumidifiers or increase airflow. If it's dropping too fast in one area and not another, we reposition air movers to balance the drying.
This is why professional structural drying isn't a set-it-and-forget-it process. Our technicians come to your property daily to take readings, check equipment, and make adjustments. The conditions change as materials dry, and the equipment setup needs to change with them.
Commercial Drying Equipment: What We Use and Why
The equipment we bring to a structural drying job is purpose-built for removing moisture from building materials. It's not what you find at a hardware store, and the difference in performance isn't incremental—it's exponential.
| Equipment | Capacity | Best For | How It Works |
|---|---|---|---|
| LGR Dehumidifier | 15-20 gal/day | General structural drying | Refrigerant coils condense moisture from air |
| Desiccant Dehumidifier | 15-25 gal/day | Cold environments, hardwood, concrete | Silica gel wheel absorbs moisture chemically |
| High-Velocity Air Mover | 2,500-3,000 CFM | Wall and floor surface drying | Focused airflow strips saturated boundary layer |
| Injectidry System | Varies | Wall cavities, under hardwood | Negative pressure pulls air through enclosed spaces |
| Floor Mat Drying Panel | Varies | Hardwood floor drying | Pulls moisture up through wood slowly and evenly |
| Thermal Imaging Camera | N/A | Moisture mapping | Detects temperature differences from evaporation |
LGR dehumidifiers (Low Grain Refrigerant)
LGR dehumidifiers are the workhorse of professional water damage drying. "Low Grain Refrigerant" refers to the unit's ability to remove moisture even when the air's grain depression (moisture content) is already relatively low—which is critical in the later stages of drying when the easy moisture is gone and you need to pull the last bit out of deep materials.
A single commercial LGR unit removes 15-20 gallons of water from the air per day. Compare that to a consumer dehumidifier from the hardware store, which pulls maybe 4-6 gallons per day—and that's under ideal conditions. In a real drying scenario with cooler temperatures and lower humidity, consumer units lose efficiency fast. LGR units maintain their performance.
For a typical 3-room drying job, we deploy 1-2 LGR dehumidifiers running 24 hours a day for the duration of the drying period. The water they collect gets drained through hoses to a sink, tub, or exterior—we don't rely on buckets that need emptying.
Desiccant dehumidifiers
Desiccant dehumidifiers work differently from refrigerant units. Instead of cooling the air to condense moisture, they pass air through a desiccant wheel (typically silica gel) that chemically absorbs moisture. The wheel rotates through a regeneration zone that heats the desiccant and expels the moisture outside through a duct.
We use desiccant units in specific situations where LGR dehumidifiers are less effective:
- Cold environments—LGR units lose efficiency below 65°F because the refrigeration cycle works less effectively in cold air. Desiccant units perform consistently regardless of temperature. Unheated basements, crawl spaces in winter, garages—desiccant is the right tool.
- Very low humidity targets—When we need to achieve RH below 30% (common with hardwood floor drying), desiccant units can reach levels that refrigerant units can't.
- Large commercial spaces—Desiccant units scale well for warehouses, commercial buildings, and multi-story drying projects where high volumes of dry air need to be delivered through ductwork.
On some jobs, we run both types simultaneously—LGR units for the bulk moisture removal and a desiccant unit focused on a specific problem area like a hardwood floor or a concrete slab.
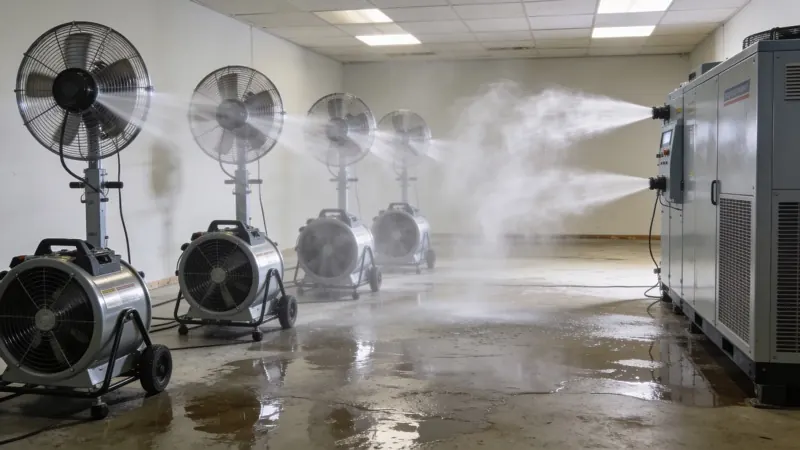
High-velocity air movers
Air movers are the fans you see lined up along walls and across floors during a drying job. But calling them "fans" undersells what they do. A professional centrifugal air mover produces 2,500-3,000 cubic feet per minute (CFM) of focused, high-velocity airflow. A household box fan produces maybe 1,200 CFM of diffused air that does almost nothing for structural drying.
The key is how the airflow interacts with wet surfaces. We angle air movers at specific positions—typically 15-20 degrees aimed at the base of walls—to create a laminar airflow pattern across the wet material. This strips the thin layer of saturated air sitting on the surface (called the boundary layer) and replaces it with drier air from the dehumidifier output. That's what drives evaporation.
The ANSI/IICRC S500 standard recommends one air mover for every 10-16 linear feet of wall, plus additional units for affected flooring. A typical bedroom with wet walls and carpet might need 3-4 air movers. A full first floor after a pipe burst might need 8-12.
Injectidry systems
Some of the most difficult drying challenges involve trapped moisture in enclosed spaces—inside wall cavities, under hardwood flooring, behind kitchen cabinets, under bathtub surrounds. Air movers and dehumidifiers handle exposed surfaces well, but they can't reach moisture locked behind drywall or under a nailed-down floor.
That's where injectidry systems come in. An injectidry unit creates negative pressure (a vacuum) through a panel that mounts against the wall or floor. Small holes are drilled in strategic locations, and hoses connected to the panel pull air through the enclosed cavity. This forces dry air from the room through the wet materials inside the wall or under the floor, extracting trapped moisture without demolishing the structure.
We use injectidry systems most often for:
- Hardwood floor drying (floor mat drying systems placed on top of the floor, pulling moisture down and out)
- Wall cavity drying when we want to save the drywall rather than cut it out
- Under-cabinet drying in kitchens and bathrooms
- Ceiling cavity drying from the floor below
Injectidry systems can save thousands of dollars in demolition and rebuild costs. Instead of ripping out wet drywall and replacing it, we can often dry it in place—as long as we catch it early enough and the drywall hasn't deteriorated.
Moisture meters and thermal imaging
You can't manage what you can't measure. Our technicians use two primary tools to track moisture levels throughout the drying process:
Pin-type moisture meters have two metal probes that penetrate the material surface and measure electrical resistance between the pins. Wet materials conduct more electricity. These give us a direct moisture content reading in wood, drywall, and other porous materials. We take readings at multiple points across every affected surface, and document each one.
Thermal imaging cameras detect temperature differences on surfaces. Wet materials are cooler than dry materials because evaporation pulls heat. A thermal image of a wall after water damage shows us exactly where moisture is hiding—even behind the drywall surface. We use thermal imaging during the initial assessment to map the full extent of water migration, and again during drying to confirm we're not missing hidden pockets of moisture.
Together, these tools let us create a moisture map of your property and track every affected area through to completion. The drying job isn't done when it "feels dry"—it's done when every material reads below its target moisture content on a calibrated meter.
Water Damage Right Now?
Our IICRC-certified crew arrives within 60 minutes with industrial drying equipment.
📞 Call (844) 426-5801Structural Drying for Different Building Materials
Not all building materials dry the same way, and not all of them can be saved. After 15 years of water damage restoration, we know which materials respond to drying, which ones need replacement, and how to tell the difference. Here's what we see on the job for the most common materials.
Hardwood flooring
Hardwood is one of the trickiest materials to dry, and one of the most expensive to replace if the drying fails. A solid oak floor can cost $8-$15 per square foot installed. Saving it with proper drying saves the homeowner thousands.
The challenge with hardwood is that wood absorbs water and swells. If it swells too much, the boards push against each other and "cup" (the edges rise higher than the center) or "crown" (the center rises higher than the edges). Severe cupping or crowning means the floor can't be saved—it needs to be pulled and replaced.
But if we get to it within the first 24-48 hours, we can often dry hardwood floors in place using floor mat drying systems. These are flat panels that sit on top of the floor and connect to a desiccant dehumidifier or injectidry unit. They pull moisture up through the wood slowly and evenly, allowing the boards to return to their normal moisture content without cracking or splitting.
Drying time: 5-7 days for hardwood flooring, sometimes longer for thicker planks or wide-plank floors. We take daily moisture readings and compare them to unaffected areas of the same flooring to determine our target moisture content (typically 6-9% for hardwood in most US climates).
When replacement is necessary: If the floor has been wet for more than 72 hours without professional drying, cupping is severe and boards have separated, or the subfloor beneath is compromised. We'll be straight with you about whether your floor can be saved—we have no interest in drying a floor that's going to buckle three weeks later.
Drywall (gypsum board)
Drywall is made of gypsum sandwiched between paper facings, and both the gypsum and the paper absorb water readily. The paper facing is also an excellent food source for mold, which is why wet drywall left untreated is ground zero for mold growth.
Drywall wicks moisture upward from the point of contact. If your floor had 3 inches of standing water, the drywall likely wicked moisture 12-24 inches above that water line. This is something homeowners almost never realize—the water on the floor was 3 inches high, but the wet zone on the wall may be 2 feet high.
When we can dry it: If the drywall hasn't been wet for more than 48 hours, hasn't started to crumble or delaminate, and shows no visible mold, we can typically dry it using air movers directed at the wall surface combined with dehumidification. For water that affected only the bottom portion of the wall, we may perform a "flood cut"—removing the bottom 12-24 inches of drywall (where the most saturation occurred) and drying the remaining wall and the studs behind it.
Drying time: 2-4 days for drywall that hasn't been saturated through its full thickness. If the entire wall section is soaked through and the cavity behind it is wet, we typically cut it out rather than try to dry it—it's faster, more reliable, and prevents mold growth on the backside where we can't monitor it.
When replacement is necessary: Drywall that's crumbling, sagging from the ceiling, or has visible mold on the surface or backside needs replacement. Category 3 (contaminated) water damage always requires drywall removal—contaminated drywall can't be decontaminated because the gypsum core absorbs contaminants.
Concrete slabs and basement floors
Concrete looks solid and impervious, but it's actually porous. A concrete slab can absorb significant amounts of water, and drying it out takes patience. Concrete dries from the surface inward, and the deeper moisture can take a long time to migrate to the surface where it can evaporate.
We've pulled moisture readings from concrete slabs that "looked dry" on the surface but were still holding elevated moisture at depth—enough to cause mold growth under carpet, buckle vinyl flooring, or delaminate epoxy coatings installed on top.
Drying approach: Air movers positioned flat against the concrete surface to maximize airflow across the slab, combined with dehumidification. For slabs in basements with limited ventilation, we often use desiccant dehumidifiers because they perform better in the cooler temperatures typical of below-grade spaces.
Drying time: 5-10 days for concrete, depending on slab thickness and how much water it absorbed. We use calcium chloride testing or relative humidity probes inserted into the concrete to measure deep moisture—surface readings alone aren't reliable for concrete.
Plaster walls
Plaster is more complicated than drywall. It's harder, denser, and holds more moisture. Plaster also dries much more slowly because of its density, and it's more prone to cracking during the drying process if it dries unevenly.
The advantage of plaster is that it's less hospitable to mold than drywall—there's no paper facing for mold to feed on. But the wood lath behind traditional plaster can absolutely grow mold if it stays wet.
Drying approach: Slower, more controlled drying than drywall. We use fewer air movers at lower velocity to prevent surface cracking, and we rely more heavily on dehumidification to pull moisture out gradually. In some cases, we drill small holes in the plaster to allow the wall cavity behind it to ventilate, then patch them after drying is complete.
Drying time: 5-8 days, sometimes longer for thick, multi-coat plaster in older homes.
Subfloor systems
The subfloor—typically 3/4-inch oriented strand board (OSB) or plywood—sits between your finish flooring and the floor joists. Water that reaches the subfloor soaks in and gets trapped between the finish floor above and the cavity below. It's one of the most common locations for hidden moisture and mold growth after water damage.
Drying approach: This depends on what is above and below. If carpet is on top, we pull the carpet and pad (pad almost always needs replacement—it holds water like a sponge) and dry the subfloor directly with air movers and dehumidification. If hardwood is on top, we use floor mat systems or injectidry panels to pull moisture through the finish floor and out of the subfloor without removing the hardwood. If the subfloor is accessible from below (crawl space or unfinished basement), we can direct air movers upward at the underside of the subfloor.
Drying time: 3-5 days for plywood subfloor, 4-6 days for OSB (which absorbs more water and swells more than plywood). If the OSB subfloor has swollen and delaminated, it needs replacement—drying won't fix structural damage.
IICRC S500 Drying Standards and Drying Classes
The IICRC (Institute of Inspection, Cleaning and Restoration Certification) publishes the ANSI/IICRC S500 standard—the reference guide for professional water damage restoration in the United States. Every drying job we perform follows these standards, and our technicians hold IICRC certification in both Water Damage Restoration (WDR) and Applied Structural Drying (ASD).
S500 classifies water damage into four classes based on how much water is present and what materials are affected. The class determines how much drying equipment we need and how long the job will take.
Class 1: Least amount of water
Only part of a room is affected. Water absorption is minimal, and only low-porosity or low-permeance materials are wet. A typical Class 1 scenario is a small dishwasher leak that affects a 10x10 section of tile flooring with minor wicking into the adjacent drywall.
Equipment needed: 1-2 air movers, possibly 1 dehumidifier. Drying time: 1-3 days. Cost range: $500-$1,500.
Class 2: Significant amount of water
An entire room or large area is affected. Water has wicked up walls less than 24 inches. Carpet, pad, and structural materials have absorbed moisture. This is the most common class we encounter—a burst pipe that floods a room, a washing machine overflow that covers a laundry room and adjacent hallway.
Equipment needed: 3-5 air movers per room, 1-2 LGR dehumidifiers. Drying time: 3-5 days. Cost range: $1,500-$4,000.
Class 3: Greatest amount of water
Water has come from overhead—ceiling, roof leak, or second-floor overflow—and saturated walls, carpet, subfloor, and insulation from top to bottom. Walls may be wet above 24 inches. Ceiling materials may be saturated. This class involves the most material saturation.
Equipment needed: 5-8 air movers per room, 2-3 dehumidifiers, possibly injectidry systems for cavity drying. Drying time: 4-7 days. Cost range: $3,000-$6,000.
Class 4: Specialty drying situations
Water has penetrated deeply into low-porosity, low-permeance materials—hardwood flooring, concrete slabs, plaster, stone, dense wood subfloors. These materials hold moisture tightly and release it very slowly. Standard drying equipment and timeframes aren't sufficient.
Equipment needed: Desiccant dehumidifiers, injectidry or floor mat systems, extended air mover placement. Lower airflow volume but longer duration. Drying time: 7-14 days. Cost range: $3,000-$8,000+.
Your insurance company will reference these classes in your claim documentation. Our reports include the class designation, the equipment deployed, daily moisture readings, and a drying timeline—exactly what your adjuster needs to process the claim. If you need help navigating the insurance side, we handle that too. More on that in our water damage insurance claim guide.
Our Moisture Monitoring Process
The difference between professional structural drying and "we put fans out" is documentation and daily monitoring. Here's exactly what happens during a structural drying job with our team.
Day 1: Initial assessment and setup
After emergency water extraction is complete, our technician creates a detailed moisture map of the property. We use thermal imaging to identify every area where water has migrated, including behind walls, under floors, and into adjacent rooms that may look dry but aren't.
We take pin-type moisture readings at multiple points on every affected surface and record the baseline readings on a drying log. We also measure the moisture content of unaffected materials in the home—this gives us our "dry standard" target. We're not trying to reach some arbitrary number. We're drying your materials to match the moisture content they were at before the water damage.
Based on the class of water damage and the materials involved, we calculate the number of air movers and dehumidifiers needed and position them strategically. Equipment gets placed, not randomly scattered around the room, but positioned based on the specific materials, wall lengths, and drying goals for each area.
Days 2-4: Daily monitoring and adjustment
Every day, our technician returns to your property. They take fresh moisture readings at every documented point, record the ambient temperature and RH, check equipment operation, and compare readings to the previous day. This data goes into your drying log.
Based on how the drying is progressing, we adjust:
- Moving air movers to focus on areas that are drying slower
- Adding or removing dehumidifiers based on RH levels
- Adjusting temperature if possible—warmer air holds more moisture and speeds drying
- Repositioning injectidry panels to address cavity areas that aren't responding
- Making the call on demolition—if a section of drywall or subfloor isn't responding to drying after 48-72 hours, we may recommend removal rather than continued drying, because the mold clock is ticking
Final day: Dry standard verification
On the final day, we take moisture readings at every documented point and compare them to both the baseline readings and the dry standard. Every affected material must read at or below the dry standard before we pull equipment.
For wood framing: below 16% moisture content. For drywall: below 1% on a non-penetrating meter or below the dry standard from unaffected areas. For concrete: below 75% internal RH or below dry standard readings. For hardwood flooring: within 2% of the moisture content in unaffected areas of the same floor.
We compile all readings, photos, equipment logs, and the drying timeline into a documentation package for your insurance company. This documentation is critical—it proves that the drying was performed to IICRC standards and justifies the equipment charges on your claim. We handle insurance claims daily and know exactly what adjusters need.
Why Household Fans and Consumer Dehumidifiers Don't Work
We get this question on almost every job: "Can't I just run fans and open the windows?" The short answer is no, and here's why.
The math doesn't work
A box fan moves about 1,200 CFM of unfocused air. A professional air mover delivers 2,500-3,000 CFM of focused, high-velocity air directed at a specific surface. But even that's only half the equation.
Without dehumidification, fans just circulate humid air. The relative humidity in a water-damaged room with fans but no dehumidifiers often sits above 70-80%. At that level, evaporation from building materials slows to a crawl. You might dry the surface of your carpet in a day or two, but the pad underneath, the subfloor below that, and the wall cavities around it stay wet.
A consumer dehumidifier from a hardware store removes 4-6 gallons of water per day. An LGR dehumidifier removes 15-20 gallons per day. After a pipe burst that deposits 200+ gallons of water into building materials, a consumer unit would take weeks to remove that moisture—and by then, mold has been growing for 14 days.
Opening windows usually makes it worse
In theory, bringing in outside air to replace humid inside air sounds logical. In practice, it rarely helps and often hurts. If the outside air is humid (which it is across most of the US for most of the year), you're replacing humid air with more humid air. If it's cold outside, the cold air lowers the temperature inside, which reduces evaporation rates and can actually slow drying.
Professional drying creates a controlled environment. We close the drying chamber (the affected rooms) and control the temperature, humidity, and airflow within it. Opening windows destroys that controlled environment and forces our equipment to work against outdoor conditions instead of just the moisture in your building materials.
Surface dry isn't structurally dry
This is the biggest misconception, and the one that leads to mold problems weeks or months later. Carpet, drywall surfaces, and hardwood floors can feel dry to the touch while the materials underneath and behind them are still holding dangerous levels of moisture.
We've pulled up "dry" carpet and found saturated pad underneath. We've opened up walls that felt dry on the surface and found mold covering the backside of the drywall and the studs. The only way to know if building materials are truly dry is to measure them with calibrated instruments—not by touching them.
How Long Structural Drying Takes by Material Type
One of the first things homeowners ask is "how long will this take?" The honest answer depends on what materials are wet, how much water they absorbed, and how quickly we got our equipment running. Here are realistic timelines based on our experience with thousands of drying jobs.
| Material | Typical Drying Time | Notes |
|---|---|---|
| Carpet and pad | 1-3 days | Pad usually replaced, not dried |
| Drywall (partial saturation) | 2-4 days | Flood cut may be needed |
| Drywall (full saturation) | Usually removed | Faster and safer to replace |
| Wood studs and framing | 3-5 days | Must reach below 16% MC |
| Plywood subfloor | 3-5 days | Depends on accessibility |
| OSB subfloor | 4-6 days | Swells more than plywood |
| Hardwood flooring | 5-7 days | Floor mat systems recommended |
| Concrete slab | 5-10 days | Dries from surface inward slowly |
| Plaster walls | 5-8 days | Slower, controlled drying needed |
| Crawl space | 3-7 days | Ventilation and access challenges |
| Insulation (fiberglass batts) | Usually removed | Can't be effectively dried once saturated |
| Insulation (spray foam) | 2-3 days | Closed-cell doesn't absorb; open-cell does |
These timelines assume professional equipment is running within 24 hours of the water event. For every 24 hours of delay, add 1-2 days to the drying timeline, and significantly increase the risk of mold growth.
If you have water damage right now and want to keep these timelines as short as possible, call (844) 426-5801. The sooner our equipment is running, the faster your property dries and the less secondary damage you face.
Real Structural Drying Jobs: What This Looks Like in Practice
Numbers and equipment lists only tell part of the story. Here are three real scenarios that show what professional structural drying looks like from start to finish.
The second-floor bathroom overflow in a two-story colonial
A toilet supply line cracked in the upstairs bathroom while the family was at work. By the time they got home eight hours later, water had been running continuously. The entire upstairs bathroom was flooded, water had traveled down the hallway, and—this is the part that really rattled them—water was dripping through the first-floor kitchen ceiling.
When we arrived, the obvious damage was the standing water upstairs and the wet ceiling downstairs. But our thermal imaging showed the full picture: water had migrated into the wall cavities on both sides of the hallway, saturated the subfloor in the bathroom and hallway, and traveled along the first-floor ceiling joists into the living room—a room that looked completely dry.
We set up a Class 3 drying operation. Upstairs: 6 air movers along the hallway walls, 2 in the bathroom, injectidry panels on the subfloor. Downstairs: we removed a section of the kitchen ceiling drywall to access the saturated joists and insulation above, positioned 4 air movers aimed upward, and ran 2 LGR dehumidifiers. Total drying time: 5 days. The first-floor living room required an additional 2 days because the moisture in the ceiling joists had migrated further than initially mapped.
Total cost for drying: approximately $4,800. Their insurance covered it under the "sudden and accidental" provision. Without the thermal imaging that found the living room ceiling involvement, that moisture would have sat there and grown mold within two weeks.
The basement sump pump failure during a spring storm
The homeowner called us at 5 AM after waking up to 4 inches of standing water in their finished basement. The sump pump had failed during an overnight rainstorm, and groundwater had been seeping in for hours. The basement had carpet, drywall, and a wet bar with cabinetry.
This was a Category 2 water event—groundwater isn't clean. After extraction (which took about 3 hours with our truck-mounted unit and portable extractors), we removed all carpet and pad—carpet pad can't be decontaminated or effectively dried after Category 2 exposure. We performed flood cuts on all drywall at 24 inches, which removed the most saturated section and exposed the wall cavities for direct drying.
The concrete slab was the long game. We positioned 8 air movers across the slab and ran 2 LGR dehumidifiers plus a desiccant unit (the basement temperature was around 58°F, which is too cold for optimal LGR performance). We applied antimicrobial treatment to all exposed surfaces and the remaining drywall above the flood cuts.
Total drying time: 7 days for the concrete slab, 4 days for the walls and framing. The homeowner's insurance covered the restoration, and we coordinated directly with their adjuster on the scope and documentation. Total drying cost: approximately $3,500, plus demolition and eventual rebuild.
The hardwood floor save after a refrigerator line leak
This one was a slow leak—the refrigerator water supply line had been dripping behind the unit for an estimated 2-3 weeks before the homeowner noticed the kitchen hardwood floor starting to cup. By the time they called us, the cupping was visible across about 120 square feet of red oak flooring.
The question was whether the floor could be saved. At $12 per square foot installed, replacement would cost around $1,500 just for the affected area—more if the adjacent flooring could not be matched. We pulled the refrigerator, fixed the leak (they called their plumber for that), and set up floor mat drying panels connected to a desiccant dehumidifier. We also ran air movers along the toe-kick area where moisture had traveled under the cabinets.
Drying took 8 days. We took daily moisture readings and watched the cupping gradually flatten as the moisture equalized. By day 8, the moisture content in the affected area was within 1.5% of the unaffected flooring in the adjacent room. Three weeks later, the floor had relaxed almost completely. Some minor sanding and refinishing was needed, but the floor was saved.
Total drying cost: approximately $2,200. The floor replacement would have been $1,500+ just for materials and labor, not counting the difficulty of matching existing flooring, so the homeowner came out ahead by drying rather than replacing.
Don't Wait for Mold to Start Growing
Every hour counts. Our certified team responds within 60 minutes, 24/7.
📞 Call (844) 426-5801Structural Drying Cost: What to Expect
Structural drying costs depend on the class of water damage, the materials involved, the size of the affected area, and how long the equipment needs to run. Here are realistic cost ranges based on our experience.
| Damage Class | Typical Affected Area | Equipment | Duration | Cost Range |
|---|---|---|---|---|
| Class 1 | Part of one room | 1-2 air movers, 1 dehumidifier | 1-3 days | $500-$1,500 |
| Class 2 | Full room, 2-3 rooms | 3-6 air movers, 1-2 dehumidifiers | 3-5 days | $1,500-$4,000 |
| Class 3 | Multi-room, ceiling involvement | 6-10+ air movers, 2-3 dehumidifiers, injectidry | 4-7 days | $3,000-$6,000 |
| Class 4 | Hardwood, concrete, plaster | Specialty equipment, desiccant dehumidifiers | 7-14 days | $3,000-$8,000+ |
What drives the price
- Number of air movers and dehumidifiers: Each piece of equipment has a daily charge. More affected area = more equipment = higher cost.
- Duration: Equipment charges are billed per day. Hardwood and concrete take longer than drywall and carpet.
- Specialty equipment: Injectidry systems, floor mat drying panels, and desiccant dehumidifiers cost more per day than standard air movers and LGR units.
- Demolition required: If flood cuts or material removal are needed before drying can begin, that adds labor and disposal costs.
- Monitoring visits: Daily technician visits for moisture readings and equipment adjustment are part of the drying scope.
Insurance coverage for structural drying
Structural drying is a standard line item on water damage insurance claims, and adjusters expect to see it. If your water damage was caused by a sudden and accidental event—pipe burst, appliance overflow, supply line failure—your homeowners insurance almost certainly covers the drying costs. We document every piece of equipment, every daily reading, and every photo so your adjuster can process the claim efficiently.
We bill your insurance directly in most cases. You typically pay only your deductible. For a full breakdown of what insurance covers and how to navigate the claims process, see our water damage insurance claim guide.
When to Call for Professional Structural Drying
Not every water spill requires professional drying. A glass of water on the kitchen floor isn't an emergency. But if any of the following apply to your situation, call (844) 426-5801 and get professional equipment running as soon as possible:
- Standing water covered more than a small area (bigger than a bathroom mat)
- Water reached carpet, drywall, or wood flooring
- Water was present for more than 2 hours before being cleaned up
- You can see or feel dampness in walls, baseboards, or flooring
- There's a musty smell even after the visible water is gone
- Water came from overhead (ceiling, second floor, roof)
- Water was Category 2 (gray, appliance, HVAC) or Category 3 (black, sewage, flood)
- You need to file an insurance claim (professional documentation is critical)
The window for preventing mold is 24-48 hours. After that window, you're no longer just drying—you're remediating. Professional structural drying within the first day is the most cost-effective investment you can make after water damage.
Call (844) 426-5801 right now. Our IICRC-certified crew arrives within 60 minutes with industrial drying equipment, starts moisture mapping your property immediately, and monitors the drying process daily until every material reads dry. We handle the insurance documentation so you don't have to. We're available 24/7/365—pipe bursts, appliance floods, and roof leaks don't wait for business hours, and neither do we.
Frequently Asked Questions About Structural Drying
Most residential structural drying jobs take 3-5 days with professional equipment. Class 4 situations involving hardwood, concrete, or plaster can take 7-14 days. The timeline depends on which materials are wet, how saturated they are, and how quickly professional equipment was deployed after the water event.
Household fans can dry surface moisture but can't dry structural components like wall cavities, subfloor, and wood framing. Without industrial dehumidification, fans circulate humid air without actually removing moisture from building materials. This leads to mold growth in hidden areas within 48-72 hours. Professional drying uses calibrated equipment and daily moisture monitoring to ensure all materials reach safe levels.
Structural drying typically costs $1,000-$4,000 for standard residential water damage, depending on the affected area and equipment needed. Class 4 situations with specialty drying can run $3,000-$8,000+. Most sudden water damage is covered by homeowners insurance, and we bill your carrier directly.
Structural drying is a coordinated system using industrial dehumidifiers, high-velocity air movers, and daily moisture monitoring to dry building materials to IICRC standards. A consumer dehumidifier removes 4-6 gallons per day from the air. An industrial LGR dehumidifier removes 15-20 gallons per day. The air movers and strategic placement are equally important—they drive moisture out of materials and into the air where the dehumidifier can capture it.
Yes, in most cases. Structural drying is a standard and expected component of water damage restoration claims. Insurance adjusters look for equipment logs, daily moisture readings, and dry standard verification—all of which we provide. Sudden and accidental water damage (pipe bursts, appliance failures, supply line breaks) is covered by standard homeowners insurance policies.
The IICRC S500 standard defines four classes. Class 1 involves minimal water affecting part of a room. Class 2 involves a full room with water wicking up walls less than 24 inches. Class 3 involves water from overhead saturating walls, ceiling, and subfloor. Class 4 involves deeply penetrated water in low-porosity materials like hardwood, concrete, and plaster requiring specialty drying techniques and longer timeframes.
We take moisture readings at every documented point using calibrated pin-type and non-penetrating moisture meters. We compare these readings to the dry standard—the moisture content of unaffected materials in the same building. Drying is complete when all affected materials read at or below the dry standard. For wood framing, that's typically below 16% moisture content. We never rely on touch or appearance alone.
In many cases, yes—if professional drying starts within 24-48 hours. We use floor mat drying systems and desiccant dehumidifiers specifically designed for hardwood. The boards need to dry slowly and evenly to avoid cracking or splitting. Drying time for hardwood is typically 5-7 days. If cupping is severe or the floor has been wet for more than 72 hours without treatment, replacement may be necessary.
Inadequate drying leads to mold growth inside wall cavities, under floors, and in ceiling assemblies—often within 48-72 hours. Beyond health risks, hidden mold requires costly mold remediation that's far more expensive than proper drying would have been. Trapped moisture also causes wood rot, delamination, and structural weakening over time.