You notice a faint musty smell in the hallway. Nothing obvious, no puddles, no dripping. But the smell won't go away. A few weeks later, the paint near the baseboard starts bubbling. You press on the wall and it gives slightly, like pushing on wet cardboard. That's when you realize the problem isn't on the wall. It's inside the wall.
Water damage behind walls is one of the most destructive, and most overlooked, problems we deal with in residential restoration. In 15 years of water damage work, we've opened up more walls than we can count where the exterior looked almost normal but the backside of the drywall was black with mold, the studs were soft, and the insulation was a soaked, sagging mess. The homeowner had no idea anything was wrong until the damage was already advanced.
The reason hidden water damage is so dangerous is simple: you can't dry what you can't see. Water inside a wall cavity doesn't evaporate the way a wet floor does. The cavity is dark, enclosed, insulated, and has almost no air circulation. Moisture gets trapped in there and stays for weeks or months, feeding mold growth and slowly rotting out the framing. By the time the visible signs show up on the outside of the wall, the damage behind it's often extensive.
If you suspect water damage inside your walls, or if you're seeing any of the warning signs we cover below, call (844) 426-5801. Our IICRC-certified technicians use thermal imaging cameras and professional moisture meters to find hidden water without tearing your walls apart. We can tell you in one visit exactly where the moisture is, how bad it is, and what needs to happen next. And we document everything for your insurance claim.
This guide covers how water gets behind walls in the first place, the visible warning signs that indicate hidden water damage, professional detection methods, what happens when it goes untreated, and how we dry wall cavities properly. If you're dealing with signs of water damage in walls, or just that nagging musty smell that won't go away, this page was written for you.
How Water Gets Behind Walls in the First Place
One of the most common questions homeowners ask us is, "How did water get inside my wall?" The answer depends on the source, but there are four main ways water ends up trapped in a wall cavity. Understanding the source matters because it determines where the damage is concentrated, how far it has spread, and what the repair process looks like.
Pipe leaks inside the wall
This is the number one cause of water damage behind walls, and it's the one we respond to most frequently. Supply lines and drain lines run through wall cavities throughout your home, behind bathroom walls, kitchen walls, laundry rooms, and utility closets. When a fitting fails, a joint corrodes, or a supply line develops a pinhole leak, water drips directly onto the backside of the drywall, runs down the studs, and pools on the bottom plate of the wall framing.
The tricky part with pipe leaks is that they aren't always dramatic. A catastrophic pipe burst floods the room and gets your attention immediately. But a slow drip from a corroded copper joint behind the shower wall can leak for months without any visible sign.
We had a job in a two-story colonial where a pinhole leak in a second-floor bathroom supply line had been dripping for an estimated four to five months. The homeowner had no idea until a brownish stain appeared on the first-floor ceiling directly below the bathroom. When we opened the wall, the studs were saturated, the insulation was destroyed, and there was active Stachybotrys (black mold) colonization across three stud bays.
Copper pipe pinhole leaks are especially common in homes built between the 1960s and 1990s. CPVC supply lines and PEX fittings can also fail, though PEX failures tend to be more sudden and noticeable. Drain line leaks from PVC joints or old cast-iron pipe at connection points are another common culprit; these are particularly problematic because drain water is Category 2 (gray water), which means the contamination level is higher and the mold risk is greater.
Exterior rain infiltration
Water can enter wall cavities from the outside through failures in the building envelope. The most common entry points we see include:
- Around windows and doors where flashing has deteriorated or was installed incorrectly
- Through cracked or missing exterior caulking
- At penetrations where pipes or cables enter the house
- Through damaged siding or stucco
- Where the roof meets a wall (called a headwall or sidewall intersection)
Rain infiltration tends to be intermittent, it only happens when it rains, particularly during wind-driven rain events when water hits the wall at an angle. This makes it harder to detect because the wall might dry partially between rain events, only to get wet again the next time it storms. Over months or years of repeated wetting cycles, the damage accumulates inside the wall without ever producing the kind of dramatic, obvious flooding that sends homeowners scrambling.
We see rain infiltration water damage most often on walls that face the prevailing wind direction, around older windows where the flashing tape has degraded, and at the base of stucco walls where weep screeds are clogged or missing. Homes with synthetic stucco (EIFS) that was popular in the 1990s are particularly vulnerable because the system traps moisture behind it when the sealant fails.
Condensation inside wall cavities
Condensation is the quiet one. It doesn't involve any plumbing failure or weather event, it's caused by temperature and humidity differences between the inside and outside of the wall. When warm, humid interior air meets a cold surface inside the wall cavity (like the backside of exterior sheathing in winter), the moisture in the air condenses into liquid water on that cold surface.
This happens most commonly in climates with cold winters, in bathrooms and kitchens where humidity is high, on exterior walls with poor insulation or vapor barrier problems, and in homes where the HVAC system isn't adequately controlling interior humidity. We also see it frequently in finished basements where framing is placed directly against a concrete foundation wall without a proper moisture barrier.
Condensation damage tends to develop slowly over an entire heating season. You might not notice it at all during the first winter. By the second or third winter, the repeated condensation cycles have saturated the insulation, created sustained moisture against the sheathing and framing, and given mold colonies months of ideal growing conditions. The homeowner eventually notices a musty smell or sees discoloration, but by then the damage has been building for a long time.
Upstairs leaks traveling down through wall cavities
Water follows gravity, and wall cavities are vertical pathways. A leak on the second floor, from a bathroom, a supply line, an appliance, can travel down through the wall framing and end up causing damage on the first floor or even in the basement. The water runs down the studs, along the bottom plate, and onto the top plate of the wall below. It can travel laterally along horizontal framing members and show up surprisingly far from the original source.
We had a job where a homeowner on the first floor noticed water staining at the base of a hallway wall, near the baseboard. There was no plumbing in that wall, no pipes, no fixtures. After inspection with a thermal imaging camera, we traced the moisture up through the wall cavity to the second floor, across a ceiling joist bay, and back to a leaking shower pan in the upstairs master bathroom. The water had traveled about 15 feet laterally and one full floor vertically before showing any visible sign. The shower pan had been leaking slowly for months.
This is why we always tell homeowners: the spot where you see the damage isn't necessarily where the problem started. Moisture mapping with thermal imaging and penetrating moisture meters is the only reliable way to trace hidden water damage back to its source. Without finding and fixing the source, drying the wall is just a temporary solution; it will get wet again.
Visible Signs of Water Damage in Walls
By the time water damage behind a wall becomes visible on the outside, the problem has usually been developing for a while. Here are the warning signs to watch for, roughly progressing from early indicators to advanced damage:
- Musty or earthy smell concentrated in one area
- Paint bubbling, peeling, or flaking near baseboards
- Yellowish or brownish stains with irregular edges
- Warped or buckling baseboards pulling away from the wall
- Peeling or separating wallpaper in a localized area
- Soft or spongy drywall that gives under light pressure
- Visible mold on the wall surface (dark spots, fuzzy patches)
If you spot any of these, it's worth getting a professional moisture assessment before the problem gets worse. Let's look at each sign in detail.
Musty or earthy smell
This is often the first sign, and the one most homeowners dismiss. A musty smell, sometimes described as earthy, damp, or like wet cardboard, typically means mold is actively growing somewhere nearby. Mold produces microbial volatile organic compounds (MVOCs) as it metabolizes organic materials. These compounds are what your nose is detecting.
If the smell is concentrated in a specific area of a room, gets stronger when the HVAC system runs, or is more noticeable on humid days, there's a good chance moisture and mold are hiding inside a wall cavity or behind a baseboard. Don't ignore a persistent musty smell, it's the wall's way of telling you something is wrong.
Paint bubbling, peeling, or flaking
When moisture behind drywall reaches the surface, it disrupts the bond between the paint and the wall surface. You'll see bubbling first, small raised areas where the paint lifts away from the drywall paper. As moisture continues, the paint starts peeling or flaking off. This is a reliable indicator that moisture has saturated the drywall from the back side.
One thing to note: paint bubbling from water damage looks different from paint bubbling caused by poor preparation or humidity in a bathroom. Water damage bubbling tends to be concentrated in a specific area (following the pattern of moisture inside the cavity) rather than distributed evenly. If the bubbles are clustered near the baseboard or in a vertical line along a stud bay, hidden water damage is the most likely cause.
Discoloration and staining
Yellowish, brownish, or dark stains on walls or ceilings are classic signs of water damage inside walls. The staining happens when water carries dissolved minerals, tannins from wood, or mold pigments through the drywall to the surface. These stains often have irregular edges and may grow or darken over time as the moisture problem continues.
A common pattern we see is a stain that starts near the base of the wall and creeps upward, this indicates water pooling at the bottom plate and wicking up through the drywall. Drywall is essentially compressed gypsum sandwiched between paper facing, and paper absorbs water readily. A piece of drywall sitting in even a small amount of standing water can wick moisture 12 to 24 inches above the water line.
Warped or buckling baseboards
Baseboards sit at the junction where the wall meets the floor, right where water inside a wall cavity tends to accumulate. When moisture reaches the bottom plate and the lower edge of the drywall, it saturates the baseboard from behind. Wood baseboards swell, warp, and pull away from the wall. MDF baseboards absorb moisture even faster and begin to swell, soften, and crumble.
If you notice baseboards that are pulling away from the wall, bowing outward, or feel soft when you press on them, there's likely moisture behind that section of wall. This is one of the more reliable visible indicators because baseboards are directly in the path of any water that accumulates at the base of a wall cavity.
Peeling or separating wallpaper
In homes with wallpaper, moisture behind the wall causes the adhesive to fail. The wallpaper separates from the surface, bubbles, or peels at the seams. Like paint bubbling, this indicates moisture migrating from the back of the drywall to the surface. If wallpaper is peeling in a specific area rather than generally throughout the room, moisture intrusion is the likely cause.
Soft or spongy drywall
When drywall absorbs enough water from behind, it loses its structural integrity. Press on the wall with your thumb in an area where you suspect moisture, if it feels soft, spongy, or gives under light pressure, the drywall is saturated. In advanced cases, you can actually push your finger through the drywall. At this point, the drywall behind the wall is compromised and will need to be replaced, not just dried.
Visible mold on the wall surface
Mold growing on the surface of a wall is the most obvious sign, and often the last one to appear. By the time mold is visible on the outside of the drywall, it has typically been growing on the backside of the drywall and on the studs inside the cavity for some time. Surface mold may look like dark spots, fuzzy patches (often gray, green, or black), or a spreading discoloration that doesn't wipe away. If you see visible mold on a wall, there's almost certainly more behind it. Our mold remediation team handles testing, containment, and removal following IICRC S520 standards.
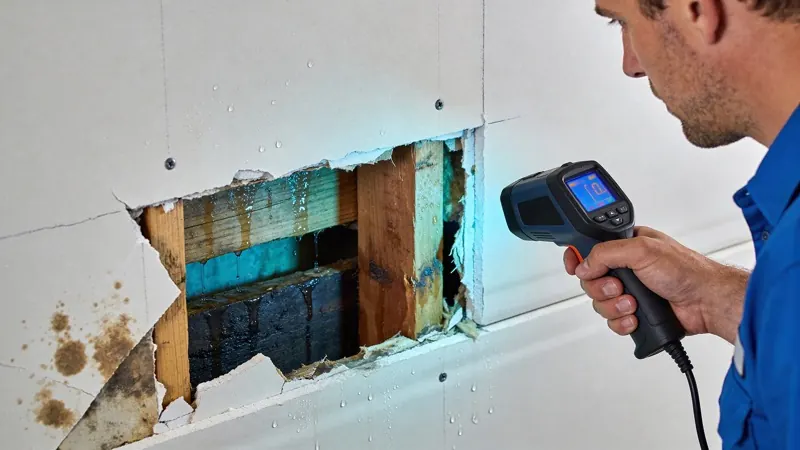
How We Detect Water Damage Inside Walls
Finding hidden water damage behind walls requires more than just looking at the surface. We use three primary methods to locate moisture inside wall cavities without unnecessary demolition. The goal is to find exactly where the water is, how far it has spread, and how wet the materials are, before we open anything up.
Infrared thermal imaging
Thermal imaging is the single most valuable tool we have for finding hidden water damage behind walls. An infrared camera detects temperature differences on surfaces, and wet areas are cooler than dry areas because of evaporative cooling. When we scan a wall with a thermal camera, wet sections inside the cavity show up as distinct cool zones, blue or purple on the screen, against the warmer, dry sections of the wall.
What makes thermal imaging so effective for water damage inside walls is that it gives us a complete picture of the affected area without making a single cut. We can see the shape and extent of the wet zone, track how far moisture has traveled vertically and laterally, and identify which stud bays are affected. This allows us to be precise about where we need to open the wall (if we need to open it at all) instead of guessing or cutting exploratory holes every few feet.
One thing thermal imaging can't do is measure actual moisture content, it shows us temperature differences, which indicate the probable presence of moisture, but the wet area needs to be confirmed with a moisture meter. That's why we always use thermal imaging and moisture meters together. The thermal camera tells us where to look. The moisture meter tells us how bad it is.
Moisture meters (pin and pinless)
Moisture meters give us actual moisture content readings for building materials. We use two types:
Pin-type moisture meters have two small metal probes that penetrate the surface of the material. The meter sends a small electrical current between the pins and measures resistance, wet materials conduct more electricity, so lower resistance means higher moisture content. Pin meters are precise and give readings for the specific depth the pins penetrate.
For drywall, we push the pins through the surface to measure moisture at the back side of the board. For wood framing, we drive pins into the stud to check the moisture content at the core.
Pinless (scan) moisture meters use electromagnetic signals to read moisture below the surface without making any holes. These are useful for quick scanning across large areas, we run the scanner along a wall and watch for spikes in the reading. Pinless meters are great for mapping the perimeter of a wet zone but less precise than pin meters for measuring the actual moisture content at a specific depth.
We use both types on every inspection. The pinless scanner maps the general area of concern. The pin meter gives us specific readings at critical points, studs, bottom plates, drywall at various heights, and subfloor. For wood framing, a reading above 16% tells us the material is wet enough to support mold growth. For drywall, we compare readings in the suspected area against a dry, unaffected reference wall in the same home to determine what is normal and what is elevated.
Visual and physical inspection
The instruments confirm what we suspect, but a good visual inspection by someone who has seen thousands of water damage jobs reveals things that no meter can quantify. We look at staining patterns, check baseboard condition, feel wall surfaces for temperature and softness, check the back of outlet and switch covers for moisture or mold (removing a cover plate is a quick, non-destructive way to see inside a wall cavity), inspect the carpet or flooring along the base of the wall, and look for rust on nail heads or fastener stains bleeding through paint.
We also check areas adjacent to the visible damage. Water inside a wall cavity rarely stays in one stud bay. It migrates laterally through gaps in the framing, around electrical and plumbing penetrations, and downward through the bottom plate into the floor system below. A thorough inspection checks the walls above, below, and on both sides of the visible damage, as well as the wall on the opposite side of the cavity and any walls or ceilings in the room below.
If you're seeing signs of hidden water damage, call (844) 426-5801 for a professional moisture assessment. We bring thermal imaging cameras and calibrated moisture meters to every inspection and give you a clear picture of what is happening inside your walls, no guesswork.
Suspect Hidden Water Damage?
Our IICRC-certified technicians use thermal imaging and moisture meters to find water behind walls without demolition. On-site within 60 minutes.
📞 Call (844) 426-5801What Happens If Water Damage Behind Walls Goes Untreated
Left alone, water damage inside walls doesn't get better. It gets progressively worse, and the consequences compound over time. Here's what we see when homeowners wait too long or don't realize water damage is present.
| Timeline | What Happens | Estimated Cost Impact |
|---|---|---|
| 24-48 hours | Mold spores begin colonizing wet surfaces | $1,500-$3,000 (drying only) |
| 1-4 weeks | Active mold growth spreads across stud bays | $5,000-$12,000 (drying + mold remediation) |
| 1-6 months | Structural rot in framing, insulation destroyed | $8,000-$15,000+ (remediation + structural repair) |
| 6+ months | Framing deterioration, pest attraction, electrical hazards | $12,000-$25,000+ (full restoration + rebuild) |
Mold colonization and spread
Mold is the most common, and most concerning, consequence of untreated water damage behind walls. The inside of a wet wall cavity is a near-perfect environment for mold growth: dark, moist, warm (from insulation), and full of organic food sources (drywall paper, wood framing, dust).
Mold can begin colonizing wet wall materials within 24 to 48 hours of moisture exposure, according to the Environmental Protection Agency. But the mold we see inside walls has usually been growing for much longer than that because the homeowner didn't know the wall was wet. By the time they call us, the mold colonies have spread across multiple stud bays, up and down the studs, across the back of the drywall, and into the insulation.
The health implications are real. Mold inside wall cavities produces spores that migrate into the living space through gaps around outlet covers, at the top and bottom of the wall, and through the HVAC system. According to the Centers for Disease Control and Prevention, mold exposure can cause nasal stuffiness, throat irritation, coughing, wheezing, eye irritation, and in sensitive individuals, more serious respiratory symptoms. People with mold allergies, asthma, or compromised immune systems are at elevated risk.
The financial impact compounds as well. Catching a wet wall early and drying it properly might cost $1,500 to $3,000. Waiting until mold is established can push the bill to $5,000 to $12,000 or more because now you're paying for mold remediation on top of the water damage restoration, containment, HEPA air filtration, removal of contaminated materials, antimicrobial treatment, and post-remediation testing.
Structural rot and framing deterioration
Wood framing that stays wet will eventually rot. The structural studs, bottom plates, top plates, and headers inside your walls are typically spruce, pine, or fir, all of which are susceptible to wood-decay fungi when moisture content stays above 20% for an extended period. The wood softens, loses its load-bearing capacity, and eventually crumbles.
We've seen bottom plates (the horizontal framing member at the base of a wall) that were so deteriorated from long-term water exposure that they had the consistency of wet cardboard. On a load-bearing wall, this is a structural safety issue; the wall is transferring roof and floor loads to the foundation through that framing, and compromised framing can't carry that weight safely.
In bathrooms and kitchens, we sometimes find rot in the studs and blocking behind tile walls where a shower pan or sink has been leaking for years. The tile on the outside looks fine, but the substrate and framing behind it are soft and deteriorated. This kind of repair requires removing the tile, replacing the rotted framing, installing new substrate, and re-tiling, a significant project that could have been a relatively minor repair if the leak had been caught early.
Electrical hazards
Electrical wiring, outlets, switches, and junction boxes run through wall cavities right alongside the plumbing and framing. When water enters the cavity, it comes into contact with these electrical components. This creates several dangers: short circuits that can trip breakers or damage appliances and electronics, corrosion of wire connections and terminals that degrade over time and create resistance points (which generate heat), and ground fault conditions that can deliver an electrical shock.
We've pulled outlet covers off walls during water damage inspections and found active water dripping down the inside of the electrical box. In one case, the homeowner had been getting intermittent sparking from a kitchen outlet for weeks before the paint next to it started bubbling, the two problems had the same cause, a leaking supply line inside the wall that was running water directly onto the electrical wiring.
If you suspect water damage behind a wall that contains electrical wiring or outlets, don't attempt to investigate by removing outlet covers yourself if there's any chance the wiring is wet. Kill the breaker to that circuit first or call us and we'll assess it safely. This isn't an area where DIY investigation is worth the risk.
Pest attraction
Wet wall cavities attract pests. Termites, carpenter ants, and various beetles are drawn to moist wood. Long-term moisture inside walls creates conditions that are ideal for wood-destroying insects, particularly in warmer climates. We've opened walls with water damage and found active termite activity in framing that was softened by prolonged moisture exposure. The moisture made the wood easier for the termites to consume, and the damage from both water and insects together was far worse than either would have been alone.
Wall Cavity Drying: How We Dry Water Damage Inside Walls
Drying water damage behind walls is fundamentally different from drying a wet floor or carpet. The challenge is that the moisture is enclosed inside a cavity with limited airflow and access. You can't just point air movers at the wall surface and expect the inside to dry. Professional wall cavity drying requires getting air and reduced humidity directly into the cavity, and there are two primary methods we use depending on the severity and the goals of the restoration.
| Factor | Flood Cut | Injectidry System |
|---|---|---|
| How it works | Remove 12-24" of drywall to expose cavity | Inject dry air through small drilled holes |
| Drying time | 3-5 days | 5-7 days |
| Wall damage | Drywall section must be replaced | Small holes patched with spackle |
| Best for | High moisture, mold present, contaminated water | Moderate moisture, specialty finishes |
| Monitoring | Visual + moisture meter | Moisture meter through ports only |
| Cost range | $500-$1,500 drywall repair per 12 ft section | Lower repair cost, higher equipment cost |
| Not suitable for | Expensive wall finishes (tile, stone) | Category 2/3 water, saturated insulation |
Flood cuts (controlled drywall removal)
A flood cut is the most common approach for water damage behind walls. We remove a section of drywall from the base of the wall, typically 12 to 24 inches high, though the height depends on how far the moisture has wicked up, exposing the inside of the wall cavity. This gives us direct access to the wet framing, insulation, and the back side of the drywall on the opposite side of the wall.
Here's how a flood cut works in practice. We use an oscillating multi-tool or a utility knife to cut the drywall horizontally along a line that's at least 2 to 4 inches above the highest point of detected moisture. We make the cut at a convenient height, usually at a horizontal line between stud bays, so the replacement piece can be fitted cleanly later. The cut drywall section is removed, along with any insulation behind it that's wet. Wet fiberglass insulation doesn't dry effectively in place and should be replaced. Wet cellulose insulation must be removed, it clumps and loses its thermal value when saturated.
With the cavity exposed, we now have direct access to the wet studs and bottom plate. We position air movers to blow air directly into the open cavities, and our industrial dehumidifiers pull the moisture out of the air as it evaporates from the framing. We also apply antimicrobial treatment to the exposed framing and the back of any remaining drywall to inhibit mold growth during the drying process.
Flood cuts are effective, relatively fast, and standard practice in the industry. The trade-off is that the removed drywall needs to be replaced after drying is complete, the section we cut out is discarded, new drywall is installed, taped, mudded, and painted. But the repair cost is modest compared to the alternative: leaving the wall sealed and allowing mold to colonize the wet framing. A 24-inch flood cut and replacement across a 12-foot wall section typically costs $500 to $1,500 for the drywall work alone, a fraction of the mold remediation bill if the wall is left wet.
Injectidry wall drying systems
When the goal is to dry a wall cavity without removing drywall, either because the drywall is still structurally sound, the moisture level is moderate, or the wall has a finish that's expensive to replicate (like custom tile, stone veneer, or specialty plaster), we use an injectidry system.
The injectidry system works by injecting warm, dry air directly into the wall cavity through small holes drilled in the drywall. The system consists of a panel that connects to our dehumidifier or drying air source, with multiple hose connections that feed into the wall cavity through ports drilled at strategic locations. The dry air circulates inside the sealed cavity, absorbs moisture from the wet materials, and the moisture-laden air is pulled back out through return ports or escapes through natural gaps.
We typically drill small holes (about 3/8 inch) near the base and near the top of the affected wall section, the lower holes inject dry air, and the upper holes allow moist air to escape, creating a circulation loop inside the cavity. The holes are small enough that patching them afterward is a simple spackling job rather than a drywall replacement.
The injectidry approach takes longer than a flood cut, typically 5 to 7 days compared to 3 to 5 days for an open-cavity dry. And it requires careful monitoring because you can't visually inspect the cavity during the process. We take daily moisture readings at multiple points through the injection ports to track the drying progress. If readings aren't dropping on schedule, we may need to revert to a flood cut to achieve proper drying.
The injectidry method isn't appropriate for every situation. If the moisture content is very high, if insulation is saturated, if there's visible mold, or if the water source was Category 2 or 3 (gray or black water), a flood cut is the right call. Contaminated water requires physical removal of porous materials, you can't inject-dry a wall that has been exposed to sewage or flood water. The contaminated materials need to come out.
Monitoring and documentation during wall cavity drying
Whether we use flood cuts or injectidry, every wall drying project requires daily monitoring. Our technicians come to your property each day to take moisture readings at multiple points within the drying zone, check equipment operation, and adjust air mover positions and dehumidifier settings based on the current conditions.
We follow ANSI/IICRC S500 drying standards, which specify that all affected materials must be dried to within normal limits before the project is considered complete. For wood framing, that means moisture content below 16%. For drywall, we compare to a dry reference in the same home. For concrete, we use relative humidity readings from in-situ probes.
Every reading is documented, date, time, location, and moisture level. This creates a drying curve that shows the progression from wet to dry over the course of the project. That documentation serves two purposes: it proves to your insurance company that the drying was done properly and thoroughly, and it gives us confidence that no hidden moisture was left behind. For details on the full structural drying process and equipment, see our dedicated structural drying page.
The Repair Process After Water Damage Behind Walls
Once the wall cavity is confirmed dry; meaning all readings are within acceptable limits, the repair and rebuild phase begins. The extent of the repair depends on what was removed during the drying process and what damage was found.
Drywall replacement
If we performed flood cuts, new drywall is measured, cut, and installed in the removed sections. The seams are taped and mudded (typically requiring two to three coats of joint compound with sanding between coats), then primed and painted. Matching the existing paint color and texture is important, if the wall has a textured finish (knockdown, orange peel, popcorn), we replicate that texture on the new section. Whole-wall repainting may be necessary if a seamless match can't be achieved.
Insulation replacement
Any insulation that was removed during the restoration is replaced before the drywall goes up. We typically recommend using the same insulation type that was originally installed to maintain consistent thermal performance. If the wall originally had fiberglass batts, we install new batts. If there's a history of moisture problems in that wall, closed-cell spray foam insulation may be a better option because it acts as both insulation and a moisture barrier, though it costs more and requires a licensed installer.
Addressing the water source
This is critical and sometimes gets overlooked in the rush to repair visible damage. The water that got behind the wall came from somewhere, and if that source isn't fixed, the wall will get wet again.
If the source was a pipe leak, the pipe needs to be repaired or replaced by a licensed plumber before the wall is closed up. If rain infiltration was the cause, the exterior envelope issue needs to be addressed, flashing repair, caulking, siding replacement, or window replacement. If condensation was the issue, improving ventilation, insulation, or vapor barrier installation may be necessary.
We coordinate with plumbers, roofers, and other trades when the source of the water damage is outside our scope of restoration. Our job is to find the moisture, dry it, remove damaged materials, and rebuild the affected area. But we also make sure the source problem is identified and communicated so that it gets fixed. Restoring a wall without fixing the leak behind it is a waste of everyone's time and money.
Real Jobs: Water Damage Behind Walls We've Handled
These are real-world examples from our restoration work that illustrate how hidden wall damage develops, gets found, and gets resolved. No two jobs are exactly alike, but these scenarios cover the most common situations.
The slow bathroom supply line leak
A homeowner in a 1980s ranch-style home called us because the hardwood flooring in their hallway was starting to cup near the bathroom wall. There was no visible water anywhere, just the floor gradually deforming over the previous two months. Our thermal imaging scan showed a cold zone extending from the bathroom wall about four feet into the hallway, inside the wall and under the subfloor. Pin meter readings in the wall studs came back at 28% to 32%, well above the 16% threshold.
We opened the wall with a flood cut and found a corroded copper fitting on the hot water supply line behind the shower. The leak was tiny, a slow weep that probably produced less than a cup of water per day. But over two to three months, that slow drip had saturated three stud bays, destroyed the fiberglass insulation, created active mold growth on the studs and backside of the drywall, and sent enough water into the subfloor to cause the hardwood cupping in the hallway.
A plumber replaced the fitting, we dried the cavity and treated for mold, and the hardwood floor was re-sanded and refinished after the subfloor dried. Total project: about two weeks from discovery to complete repair.
The second-floor toilet overflow
A family came home from a weekend trip to find that a toilet on the second floor had overflowed while they were gone, the fill valve stuck open, and water ran continuously for an estimated 36 to 48 hours. The obvious damage was on the second-floor bathroom floor and the first-floor ceiling below it, where water was actively dripping. But the hidden damage was inside the walls.
Water from the overflow had entered the wall cavity behind the toilet through the gap around the supply line penetration. From there, it traveled down through the wall, through the first-floor ceiling, and into the wall cavity below. Our thermal scan showed wet zones in four separate wall sections across two floors. The water had followed the path of least resistance, along framing members, through penetrations, and down through the cavity.
Because the water source was a toilet (Category 2 water, gray water), all porous materials the water contacted had to be removed. That meant flood cuts in four wall sections, insulation removal, ceiling drywall removal on the first floor, and antimicrobial treatment throughout. Drying took five days with multiple dehumidifiers and air movers staged on both floors.
The rebuild included new drywall, insulation, ceiling repair, and painting. The homeowner's insurance covered the entire restoration. They paid their $1,000 deductible.
The mystery musty smell
This one is more common than people think. A homeowner called us because they had a persistent musty smell in their living room that had been bothering them for about six months. They had the carpets cleaned, checked the HVAC filters, and even called a mold testing company that took air samples (which came back slightly elevated but inconclusive). No one had checked the walls.
Our thermal imaging scan of the exterior wall showed a cool zone spanning about six feet along the base of the wall, a classic signature of moisture inside the cavity. Pin meter readings confirmed moisture levels of 22% to 26% in the studs. We performed a flood cut and found moderate mold growth along the bottom plate and the lower 12 inches of the studs. The insulation was damp and had mold on its paper facing.
The cause turned out to be a flashing failure where the roof overhang met the wall. During wind-driven rain, water was getting behind the siding and running down into the wall cavity. It had been happening intermittently for what appeared to be one to two years based on the extent of the mold growth and wood staining.
The exterior flashing was repaired, the mold was remediated, the cavity was dried, and new insulation and drywall were installed. Total time from inspection to completed repair: about 10 days.
Don't Let Hidden Damage Spread
Every day water sits inside your walls, the damage grows and the cost increases. Our 24/7 team responds within 1 hour.
📞 Call (844) 426-5801How to Prevent Water Damage Behind Walls
Prevention is always cheaper than restoration. While you can't prevent every possible source of hidden water damage, these steps significantly reduce your risk.
Inspect plumbing supply lines regularly. Check visible supply lines under sinks, behind toilets, and at the washing machine for signs of corrosion, bulging, or dripping. Replace rubber supply hoses with braided stainless steel, rubber hoses are the number one cause of catastrophic washing machine floods. If your home has copper supply lines and is more than 30 years old, have a plumber inspect for signs of pinhole corrosion.
Maintain your building envelope. Inspect caulking around windows and doors annually. Check siding, stucco, and trim for cracks, gaps, or deterioration. Make sure flashing at roof-to-wall intersections is intact and properly sealed. Clean gutters and downspouts so water drains away from the foundation instead of pooling against the walls.
Control interior humidity. Keep indoor relative humidity between 30% and 50% year-round. Run bathroom exhaust fans during and for 20 to 30 minutes after showers. Make sure dryer vents are connected and exhausting to the exterior, not into a wall cavity or attic. In humid climates, a whole-house dehumidifier integrated with your HVAC system is a worthwhile investment.
Address small leaks immediately. A dripping faucet, a slow toilet leak, a minor stain on the ceiling, these are warning signs that water is going somewhere it should not. Every major water damage job we've ever worked started as a minor problem that was ignored or dismissed. Fixing a drip costs $100 to $300. Restoring the wall that drip saturated over six months costs $3,000 to $8,000 or more.
Install water leak detection sensors. Battery-powered water sensors cost $15 to $50 each and can be placed at the base of walls behind toilets, under sinks, near the water heater, and at the washing machine. When they detect water, they alarm. Some smart models send alerts to your phone. These devices don't prevent leaks, but they catch them early, and early detection is the single biggest factor in keeping water damage manageable and affordable.
Frequently Asked Questions About Water Damage Behind Walls
Look for musty smells concentrated in one area, paint bubbling or peeling near baseboards, discoloration or staining on the wall surface, warped or soft baseboards, and drywall that feels spongy when pressed. If you notice any of these signs, a professional moisture inspection with thermal imaging and moisture meters can confirm whether water is present inside the wall cavity without cutting into the wall.
Yes. Wall cavities are one of the most common locations for hidden mold growth after water damage. The dark, enclosed, insulated environment inside a wall is ideal for mold, spores can begin colonizing wet drywall and wood framing within 24 to 48 hours. If the wall stays wet, mold can spread across multiple stud bays and produce spores that affect your indoor air quality.
Professional wall cavity drying typically takes 3 to 5 days when flood cuts are used to expose the cavity, and 5 to 7 days when using injectidry systems that dry through the sealed wall. Actual timelines depend on the severity of saturation, the materials involved, ambient conditions, and how quickly drying begins after the water event. Our technicians monitor moisture levels daily and adjust equipment until all materials reach their dry standard.
We recommend having a professional inspect the wall with thermal imaging and moisture meters before opening it. Cutting into a wall that contains mold can release spores into your home. A professional inspection identifies exactly where the moisture is, how extensive it is, and whether mold is present, so the opening can be done safely, with containment if needed, and in the right locations.
In most cases, yes, if the water damage was sudden and accidental. A burst pipe behind a wall, a supply line failure, or an appliance overflow are typically covered events under standard homeowners policies. Gradual damage from a slow leak you neglected may not be covered. We document every aspect of wall cavity restoration for your insurance claim and bill your carrier directly.
Hidden water damage typically produces a musty, earthy, or damp smell caused by mold growth and microbial activity inside the wall cavity. The smell may be more noticeable when the HVAC system runs (because air circulates through and around the wall cavity), on humid days, or when you're close to the affected section of wall. A persistent musty smell in a specific area is one of the earliest warning signs of hidden moisture.
No. A household fan blowing on the outside of a wall does almost nothing for moisture trapped inside the cavity. The drywall surface may feel dry to the touch while the studs, insulation, and backside of the drywall remain saturated. Professional wall cavity drying requires either opening the wall (flood cuts) or injecting dry air directly into the cavity (injectidry), combined with industrial dehumidification. Consumer equipment can't replicate this.
The cost depends on the extent of the damage, the number of wall sections affected, and whether mold is present. Drying and repairing a single wall section with a flood cut typically runs $1,500 to $4,000. If mold remediation is needed, costs increase to $4,000 to $10,000 or more depending on the scope. For detailed pricing information, see our water damage repair cost guide.
It depends on the severity and whether mold is present. Minor moisture behind a wall without mold isn't an immediate health risk, but it should be addressed promptly before mold develops. If mold is actively growing inside the wall cavity, occupants, especially those with allergies, asthma, or immune conditions, may experience respiratory symptoms from mold spore exposure. A professional inspection determines the severity and recommends whether any precautions are needed.
We use infrared thermal imaging cameras and professional-grade moisture meters. The thermal camera detects temperature differences on the wall surface, wet areas appear cooler due to evaporative cooling and show up as distinct zones on the thermal image. Moisture meters (both pin-type and pinless scanners) measure the actual moisture content of the wall materials. Together, these tools map the extent of hidden moisture without any demolition.
Stop Guessing, Get a Professional Moisture Assessment
Water damage behind walls is one of those problems that only gets worse with time. The moisture doesn't dry on its own inside an enclosed wall cavity. Mold doesn't stop growing because you can't see it. Framing doesn't stop rotting because the outside of the wall looks fine.
The longer hidden water damage goes undetected and untreated, the more expensive and invasive the repair becomes.
If you're dealing with any of the signs we covered in this guide, musty smells, bubbling paint, warped baseboards, staining, soft spots, or if you had a water event and aren't sure whether your walls are fully dry, get a professional assessment. We use thermal imaging cameras and calibrated moisture meters to give you a definitive answer about what is happening inside your walls.
Our water damage restoration team is IICRC certified, on call 24/7, and on-site within 60 minutes. We handle everything from initial inspection and moisture mapping through drying, mold prevention, and full wall repair, and we document the entire process for your insurance claim. Most sudden water damage is covered by homeowners insurance, and we bill your carrier directly.
Call (844) 426-5801 now for a moisture assessment. The sooner hidden water damage is found, the less it costs to fix, and the safer your home will be.